Ch 3 — Testing with LLVM LIT
Testing with LLVM LIT In the previous chapter, we learned how to take advantage of LLVM's own CMake utilities to improve our development experience. We also learned how to seamlessly integrate LLVM into other out-of-tree projects. In this chapter, we're going to talk about how to get hands-on with LLVM's own testing infrastructure, LIT. LIT is a testing infrastructure that was originally developed for running LLVM's regression tests. Now, it's not only the harness for running all the tests in LLVM (both unit and regression tests) but also a generic testing framework that can be used outside of LLVM. It also provides a wide range of testing formats to tackle different scenarios. This chapter will give you a thorough tour of the components in this framework and help you master LIT. We are going to cover the following topics in this chapter:
• Using LIT in out-of-tree projects • Learning about advanced FileCheck tricks • Exploring the TestSuite framework
26 Testing with LLVM LIT
Technical requirements The core of LIT is written in Python, so please make sure you have Python 2.7 or Python 3.x installed (Python 3.x is preferable, as LLVM is gradually retiring Python 2.7 now). In addition, there are a bunch of supporting utilities, such as FileCheck, which will be used later. To build those utilities, the fastest way, unfortunately, is to build any of the check-XXX (phony) targets. For example, we could build check-llvm-support, as shown in the following code:
$ ninja check-llvm-support
Finally, the last section requires that llvm-test-suite has been built, which is a separate repository from llvm-project. We can clone it by using the following command:
$ git clone https://github.com/llvm/llvm-test-suite
The easiest way to configure the build will be using one of the cached CMake configs. For example, to build the test suite with optimizations (O3), we will use the following code:
$ mkdir .O3_build $ cd .O3_build $ cmake -G Ninja -DCMAKE_C_COMPILER=<desired Clang binary \ path> -C ../cmake/caches/O3.cmake ../
Then, we can build it normally using the following command:
$ ninja all
Using LIT in out-of-tree projects Writing an in-tree LLVM IR regression test is pretty easy: all you need to do is annotate the IR file with testing directives. Look at the following script, for example:
  ; RUN: opt < %s -instcombine -S -o - | FileCheck %s
  target triple = "x86_64-unknown-linux"
  define i32 @foo(i32 %c) {
  entry:
    ; CHECK: [[RET:%.+]] = add nsw i32 %c, 3
    ; CHECK: ret i32 [[RET]]
    %add1 = add nsw i32 %c, 1
Using LIT in out-of-tree projects 27
      %add2 = add nsw i32 %add1, 2
      ret i32 %add2
  }
This script checks if InstCombine (triggered by the -instcombine command-line option shown in the preceding snippet) simplifies two succeeding arithmetic adds into one. After putting this file into an arbitrary folder under llvm/test, the script will automatically be picked and run as part of the regression test when you're executing the llvm-lit command-line tool. Despite its convenience, this barely helps you use LIT in out-of-tree projects. Using LIT out-of-tree is especially useful when your project needs some end-to-end testing facilities, such as a format converter, a text processor, a linter, and, of course, a compiler. This section will show you how to bring LIT to your out-of-tree projects, and then provide you with a complete picture of the running flow of LIT.
Preparing for our example project In this section, we will use an out-of-tree CMake project. This example project builds a command-line tool, js-minifier, that minifies arbitrary JavaScript code. We will transform the following JavaScript code:
  const foo = (a, b) => {
    let c = a + b;
    console.log(`This is ${c}`);
  }
This will be transformed into some other semantic-equivalent code that is as short as possible:
const foo = (a,b) => {let c = a + b; console.log(`This is ${c}`);}
Instead of teaching you how to write this js-minifier, the goal of this section is to show you how to create a LIT testing environment to test this tool. The example project has the following folder structure:
  /JSMinifier
    |__ CMakeLists.txt
    |__ /src
        |__ js-minifier.cpp
28 Testing with LLVM LIT
     |__ /test
         |__ test.js
         |__ CMakeLists.txt
     |__ /build
The files under the /src folder contain the source code for js-minifier (which we are not going to cover here). What we will focus on here are the files that will be used for testing js-minifier, which sit under the /test folder (for now, there is only one file, test.js). In this section, we are going to set up a testing environment so that when we run llvmlit – the testing driver and main character of this section – under the CMake /build folder, it will print testing results, like this:
$ cd build $ llvm-lit -sv . -- Testing: 1 tests, 1 workers – PASS: JSMinifier Test :: test.js (1 of 1) Testing Time: 0.03s Expected Passes : 1
This shows how many and what test cases have passed. Here is the testing script, test.js:
// RUN: %jsm %s -o - | FileCheck
// CHECK: const foo = (a,b) => // CHECK-SAME: {let c = a + b; console.log(`This is ${c}`);} const foo = (a, b) => { let c = a + b; console.log(`This is ${c}`); }
As you can see, it is a simple testing process that runs the js-minifier tool – represented by the %jsm directive, which will be replaced by the real path to js-minifier executable, as explained later – and checks the running result with FileCheck by using its CHECK and CHECK-SAME directives.
Using LIT in out-of-tree projects 29
With that, we've set up our example project. Before we wrap up the preparation, there is one final tool we need to create. Since we're trying to cut down on our reliance on the LLVM source tree, recreate the llvm-lit command-line tool using the LIT package available in the PyPi repository (that is, the pip command-line tool). All you need to do is install that package:
$ pip install --user lit
Finally, wrap the package with the following script:
#!/usr/bin/env python from lit.main import main if __name__ == '__main__': main()
Now, we can use LIT without building an LLVM tree! Next, we will create some LIT configuration scripts that will drive the whole testing flow.
Writing LIT configurations In this subsection, we'll show you how to write LIT configuration scripts. These scripts describe the testing process – where the files will be tested, the testing environment (if we need to import any tool, for example), the policy when there is a failure, and so on. Learning these skills can greatly improve how you use LIT in places outside the LLVM tree. Let's get started:
  1. Inside the /JSMinifier/test folder, create a file called lit.cfg.py that
     contains the following content:
         import lit.formats
         config.name = 'JSMinifier Test'
         config.test_format = lit.formats.ShTest(True)
         config.suffixes = ['.js']
      Here, the snippet is providing LIT with some information. The config variable
      here is a Python object that will be populated later when this script is loaded
      into LIT's runtime. It's basically a registry with predefined fields that carry
      configuration values, along with custom fields that can be added by lit.*.py
      scripts at any time.
30 Testing with LLVM LIT
      The config.test_format field suggests that LIT will run every test inside
      a shell environment (in the ShTest format), while the config.suffixes field
      suggests that only files with .js in their filename suffix will be treated as test cases
      (that is, all the JavaScript files).
 2. Following on from the code snippet in the previous step, LIT now needs two other
    pieces of information: the root path to the test files and the working directory:
         …
         config.suffixes = ['.js']
         config.test_source_root = os.path.dirname(__file__)
         config.test_exec_root = os.path.join(config.my_obj_root,
         'test')
      For config.test_source_root, it's simply pointing to /JSMinifier/test.
      On the other hand, config.test_exec_root, which is the working directory,
      is pointing to a place whose parent folder is the value of a custom configuration
      field, my_obj_root. While it will be introduced later, simply put, it points to the
      build folder path. In other words, config.test_exec_root will eventually
      have a value of /JSMinifier/build/test.
 3. The %jsm directive we saw earlier in test.js is used as a placeholder that will
    eventually be replaced with the real/absolute path of the js-minifier executable.
    The following lines will set up the replacements:
         …
         config.test_exec_root = os.path.join(config.my_obj_root,
         'test')
         config.substitutions.append(('%jsm',
             os.path.join(config.my_obj_root, 'js-minifier')))
      This code adds a new entry to the config.substitutions field, which makes
      LIT replace every %jsm occurrence in the test files with the /JSMinifier/
      build/js-minifier value. This wraps up all the content in lit.cfg.py.
Using LIT in out-of-tree projects 31
4. Now, create a new file called lit.site.cfg.py.in and put it under the / JSMinifier/test folder. The first part of this file looks like this:
       import os
       config.my_src_root = r'@CMAKE_SOURCE_DIR@'
       config.my_obj_root = r'@CMAKE_BINARY_DIR@'
    The mystery config.my_obj_root field is finally resolved here, but instead
    of pointing to a normal string, it is assigned to a weird value called @CMAKE_
    BINARY_DIR@. Again, this will be replaced by CMake with the real path later. The
    same goes for the config.my_src_root field.
5. Finally, lit.site.cfg.py.in is wrapped up by these lines:
       …
       lit_config.load_configure(
           config, os.path.join(config.my_src_root, 'test/
             lit.cfg.py'))
    Even though this snippet is pretty simple, it's a little hard to understand. Simply
    put, this file will eventually be materialized into another file, with all the variables
    clamped by @ being resolved and copied into the build folder. From there, it will
    call back the lit.cfg.py script we saw in the earlier steps. This will be explained
    later in this section.
6. Finally, it's time to replace those weird @-clamped strings with real values using
   CMake's configure_file function. In /JSMinifier/test/CMakeLists.
   txt, add the following line somewhere inside the file:
       configure_file(lit.site.cfg.py.in
                      lit.site.cfg.py @ONLY)
    The configure_file function will replace all the @-clamped string occurrences
    in the input file (lit.site.cfg.py.in, in this case) with their CMake variable
    counterparts in the current CMake context.
    For example, let's say there is a file called demo.txt.in that contains the following
    content:
       name = "@FOO@"
       age = @AGE@
32 Testing with LLVM LIT
      Now, let's use configure_file in CMakeLists.txt:
         set(FOO "John Smith")
         set(AGE 87)
         configure_file(demo.txt.in
                        demo.txt @ONLY)
      Here, the aforementioned replacement will kick in and generate an output file,
      demo.txt, that contains the following content:
         name = "John Smith"
         age = 87
  7. Back to the lit.site.cfg.py.in snippets, since CMAKE_SOURCE_DIR and
     CMAKE_BINARY_DIR are always available, they point to the root source folder and
     the build folder, respectively. The resulting /JSMinifier/build/test/lit.
     site.cfg.py will contain the following content:
         import os
         config.my_src_root = r'/absolute/path/to/JSMinifier'
         config.my_obj_root = r'/absolute/path/to/JSMinifier/
         build'
         lit_config.load_config(
             config, os.path.join(config.my_src_root, 'test/
               lit.cfg.py'))
With that, we have learned how to write LIT configuration scripts for our example project. Now, it is time to explain some details of how LIT works internally, and why we need so many files (lit.cfg.py, lit.site.cfg.py.in, and lit.site.cfg.py).
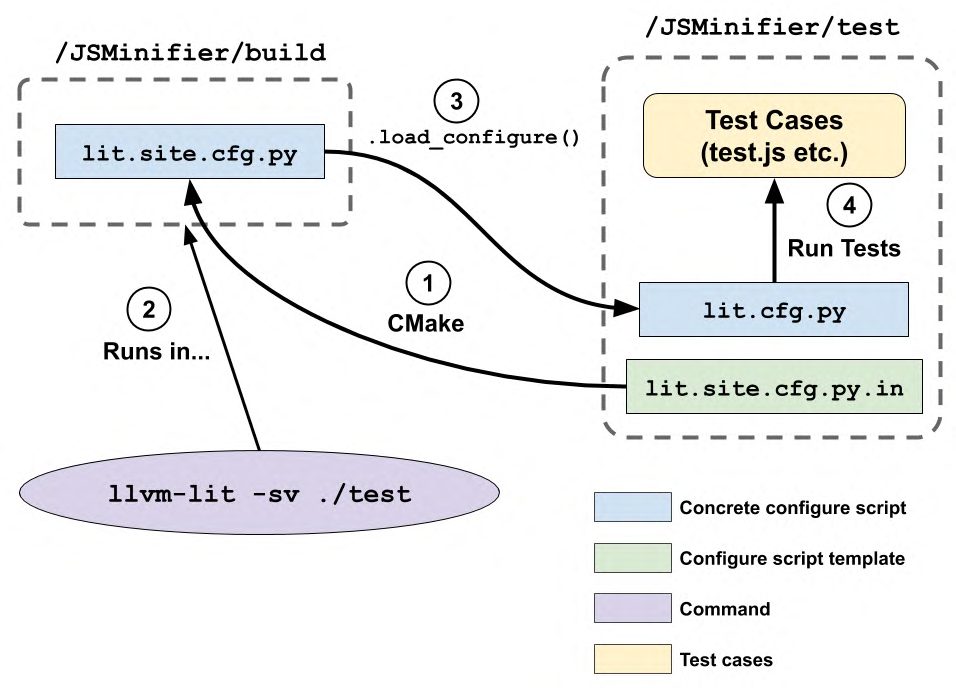
LIT internals Let's look at the following diagram, which illustrates the workflow of running LIT tests in the demo project we just created:
Using LIT in out-of-tree projects 33
                    Figure 3.1 – The forking flow of LIT in our example project
Let's take a look at this diagram in more detail:
  1. lit.site.cfg.py.in is copied to /JSMinifier/build/lit.site.cfg.
     py, which carries some CMake variable values.
  2. The llvm-lit command is launched inside /JSMinifier/build. It will
     execute lit.site.cfg.py first.
  3. lit.site.cfg.py then uses the load_configure Python function to load
     the main LIT configurations (lit.cfg.py) and run all the test cases.
The most crucial part of this diagram is explaining the roles of lit.site.cfg.py and lit.site.cfg.py.in: many parameters, such as the absolute path to the build folder, will remain unknown until the CMake configuration process is complete. So, a trampoline script – that is, lit.site.cfg.py – is placed inside the build folder to relay that information to the real test runner. In this section, we learned how to write LIT configuration scripts for our out-of-tree example project. We also learned how LIT works under the hood. Knowing this can help you use LIT in a wide variety of projects, in addition to LLVM. In the next section, we will focus on FileCheck, a crucial and commonly used LIT utility that performs advanced pattern checking.
34 Testing with LLVM LIT
Learning useful FileCheck tricks FileCheck is an advanced pattern checker that originates from LLVM. It has a similar role as the grep command-line tool available in Unix/Linux systems, but provides a more powerful yet straightforward syntax for line-based contexts. Furthermore, the fact that you can put FileCheck directives beside the testing targets makes the test cases selfcontained and easy to understand. Though basic FileCheck syntax is easy to get hands-on with, there are many other FileCheck functionalities that truly unleash the power of FileCheck and greatly improve your testing experiences – creating more concise testing scripts and parsing more complex program output, to name a few. This section will show you some of those skills.
Preparing for our example project The FileCheck command-line tool needs to be built first. Similar to the previous section, building one of the check-XXX (phony) targets in the LLVM tree is the easiest way to do so. The following is an example of this:
$ ninja check-llvm-support
In this section, we are going to use an imaginary command-line tool called js-obfuscator, a JavaScript obfuscator, for our example. Obfuscation is a common technique that's used to hide intellectual properties or enforce security protections. For example, we could use a real-world JavaScript obfuscator on the following JavaScript code:
  const onLoginPOST = (req, resp) => {
    if(req.name == 'admin')
      resp.send('OK');
    else
      resp.sendError(403);
  }
  myReset.post('/console', onLoginPOST);
This would transform it into the following code:
  const t = "nikfmnsdzaO";
  const aaa = (a, b) => {
    if(a.z[0] == t[9] && a.z[1] == t[7] &&…)
      b.f0(t[10] + t[2].toUpperCase());
    else
      b.f1(0x193);
Learning useful FileCheck tricks 35
} G.f4(YYY, aaa);
This tool will try to make the original script as human-unreadable as possible. The challenge for the testing part is to verify its correctness while still reserving enough space for randomness. Simply put, js-obfuscator will only apply four obfuscation rules:
  1. Only obfuscate local variable names, including formal parameters. The formal
     parameter names should always be obfuscated in <lower case word><argument
     index number> format. The local variable names will always be obfuscated into
     a combination of lowercase and uppercase letters.
  2. If we are declaring functions with the arrow syntax – for example, let foo =
     (arg1, arg2) => {…} – the arrow and the left curly brace (=> {) need to be
     put in the next line.
  3. Replace a literal number with the same value but in a different representation; for
     example, replacing 87 with 0x57 or 87.000.
  4. When you supply the tool with the --shuffle-funcs command-line option,
     shuffle the declaration/appearing order of the top-level functions.
Finally, the following JavaScript code is the example to be used with the js-obfuscator tool:
  const square = x => x * x;
  const cube = x => x * x * x;
  const my_func1 = (input1, input2, input3) => {
    // TODO: Check if the arrow and curly brace are in the second
    // line
    // TODO: Check if local variable and parameter names are
    // obfuscated
    let intermediate = square(input3);
    let output = input1 + intermediate - input2;
    return output;
  }
  const my_func2 = (factor1, factor2) => {
    // TODO: Check if local variable and parameter names are
    // obfuscated
    let term2 = cube(factor1);
    // TODO: Check if literal numbers are obfuscated
    return my_func1(94,
36 Testing with LLVM LIT
term2, factor2); } console.log(my_func2(1,2));
Writing FileCheck directives The following steps are going to fill in all the TODO comments that appeared in the preceding code:
  1. Going according to the line number, the first task is to check whether the
     local variables and parameters have been obfuscated properly. According to
     the spec, formal parameters have special renaming rules (that is, <lower case
     word><argument index number>), so using the normal CHECK directive with
     FileCheck's own regex syntax will be the most suitable solution here:
         // CHECK: my_func1 = ({{[a-z]+0}}, {{[a-z]+1}},
         // {{[a-z]+2}})
         const my_func1 = (input1, input2, input3) => {
         …
      FileCheck uses a subset of regular expressions for pattern matching, which are
      enclosed by either {{…}} or [[…]] symbols. We will cover the latter one shortly.
  2. This code looks pretty straightforward. However, the semantics of the code also
     need to be correct once obfuscation has been performed. So, in addition to checking
     the format, the succeeding references to those parameters need to be refactored as
     well, which is where FileCheck's pattern binding comes in:
         // CHECK: my_func1 = ([[A0:[a-z]+0]],
         // [[A1:[a-z]+1]], [[A2:[a-z]+2]])
         const my_func1 = (input1, input2, input3) => {
           // CHECK: square([[A2]])
           let intermediate = square(input3);
         …
      This code binds the pattern of the formal parameters with the names A0 ~ A2 using
      the [[…]] syntax, in which the binding variable name and the pattern are divided
      by a colon: [[<binding variable>:<pattern>]]. On the reference sites of
      the binding variable, the same [[…]] syntax is used, but without the pattern part.
Learning useful FileCheck tricks 37
      Note
      A binding variable can have multiple definition sites. Its reference sites will
      read the last defined value.
3. Let's not forget the second rule – the arrow and left curly brace of the function
   header need to be put in the second line. To implement the concept of "the line
   after," we can use the CHECK-NEXT directive:
       // CHECK: my_func1 = ([[A0:[a-z]+0]],
       // [[A1:[a-z]+1]], [[A2:[a-z]+2]])
       const my_func1 = (input1, input2, input3) => {
         // CHECK-NEXT: => {
    Compared to the original CHECK directive, CHECK-NEXT will not only check if
    the pattern exists but also ensure that the pattern is in the line that follows the line
    matched by the previous directive.
4. Next, all the local variables and formal parameters are checked in my_func1:
       // CHECK: my_func1 = ([[A0:[a-z]+0]],
       // [[A1:[a-z]+1]], [[A2:[a-z]+2]])
       const my_func1 = (input1, input2, input3) => {
         // CHECK: let [[IM:[a-zA-Z]+]] = square([[A2]]);
         let intermediate = square(input3);
         // CHECK: let [[OUT:[a-zA-Z]+]] =
         // CHECK-SAME: [[A0]] + [[IM]] - [[A1]];
         let output = input1 + intermediate - input2;
         // CHECK: return [[OUT]];
         return output;
       }
    As highlighted in the preceding code, the CHECK-SAME directive was used to
    match the succeeding pattern in the exact same line. The rationale behind this is
    that FileCheck expected different CHECK directives to be matched in different lines.
    So, let's say part of the snippet was written like this:
       // CHECK: let [[OUT:[a-zA-Z]+]] =
       // CHECK: [[A0]] + [[IM]] - [[A1]];
    It will only match code that spread across two lines or more, as shown here:
       let BGHr =
           r0 + jkF + r1;
38 Testing with LLVM LIT
      It will throw an error otherwise. This directive is especially useful if you wish to
      avoid writing a super long line of checking statements, thus making the testing
      scripts more concise and readable.
 5. Going into my_func2, now, it's time to check if the literal numbers have been
    obfuscated properly. The checking statement here is designed to accept any
    instances/patterns except the original numbers. Therefore, the CHECK-NOT
    directive will be sufficient here:
         …
         // CHECK: return my_func1(
         // CHECK-NOT: 94
         return my_func1(94,
                          term2, factor2);
        Note
        The first CHECK directive is required. This is because CHECK-NOT will not
        move the cursor from the line before return my_func1(94. Here,
        CHECK-NOT will give a false negative without a CHECK directive to move the
        cursor to the correct line first.
      In addition, CHECK-NOT is pretty useful to express the concept of not <a specific
      pattern>…but <the correct pattern> when it's used with CHECK-SAME, as we
      mentioned earlier.
      For example, if the obfuscation rule states that all the literal numbers need to be
      obfuscated into their hexadecimal counterparts, then you can express the assertion
      of don't want to see 94… but want to see 0x5E/0x5e at the same place instead using
      the following code:
         …
         // CHECK: return my_func1
         // CHECK-NOT: 94,
         // CHECK-SAME: {{0x5[eE]}}
         return my_func1(94,
                         term2, factor2);
Learning useful FileCheck tricks 39
6. Now, only one obfuscation rule needs to be verified: when the js-obfuscator tool is supplied with an additional command-line option, --shuffle-funcs, which effectively shuffles all top-level functions, we need to check whether the top-level functions maintain certain ordering, even after they have been shuffled. In JavaScript, functions are resolved when they're called. This means that cube, square, my_func1, and my_func2 can have an arbitrary ordering, as long as they're placed before the console.log(…) statement. To express this kind of flexibility, the CHECK-DAG directive can be pretty useful. Adjacent CHECK-DAG directives will match texts in arbitrary orders. For example, let's say we have the following directives: // CHECK-DAG: 123 // CHECK-DAG: 456
These directives will match the following content:
They will also match the following content:
    However, this freedom of ordering will not hold across either a CHECK or CHECK-
    NOT directive. For example, let's say we have these directives:
       // CHECK-DAG: 123
       // CHECK-DAG: 456
       // CHECK: 789
       // CHECK-DAG: abc
       // CHECK-DAG: def
    These directives will match the following text:
       def
       abc
40 Testing with LLVM LIT
      However, they will not match the following text:
         def
         abc
 7. Back to our motivated example, the obfuscation rule can be checked by using the
    following code:
         …
         // CHECK-DAG: const square =
         // CHECK-DAG: const cube =
         // CHECK-DAG: const my_func1 =
         // CHECK-DAG: const my_func2 =
         // CHECK: console.log
         console.log(my_func2(1,2));
      However, function shuffling will only happen if an additional command-line
      option is supplied to the tool. Fortunately, FileCheck provides a way to multiplex
      different check suites into a single file, where each suite can define how it runs and
      separates the checks from other suites.
 8. The idea of the check prefix in FileCheck is pretty simple: you can create a check
    suite that runs independently with other suites. Instead of using the CHECK string,
    each suite will replace it with another string in all the directives mentioned earlier
    (CHECK-NOT and CHECK-SAME, to name a few), including CHECK itself, in order
    to distinguish it from other suites in the same file. For example, you can create a
    suite with the YOLO prefix so that that part of the example now looks as follows:
         // YOLO: my_func2 = ([[A0:[a-z]+0]], [[A1:[a-z]+1]])
         const my_func2 = (factor1, factor2) => {
         …
         // YOLO-NOT: return my_func1(94,
         // YOLO-SAME: return my_func1({{0x5[eE]}},
         return my_func1(94,
                         term2, factor2);
         …
Learning useful FileCheck tricks 41
      To use a custom prefix, it needs to be specified in the --check-prefix
      command-line option. Here, the FileCheck command invocation will look
      like this:
         $ cat test.out.js | FileCheck --check-prefix=YOLO test.js
  9. Finally, let's go back to our example. The last obfuscation rule can be solved by using
     an alternative prefix for those CHECK-DAG directives:
         …
         // CHECK-SHUFFLE-DAG: const square =
         // CHECK-SHUFFLE-DAG: const cube =
         // CHECK-SHUFFLE-DAG: const my_func1 =
         // CHECK-SHUFFLE-DAG: const my_func2 =
         // CHECK-SHUFFLE: console.log
         console.log(my_func2(1,2));
This must be combined with the default check suite. All the checks mentioned in this section can be run in two separate commands, as follows:
# Running the default check suite $ js-obfuscator test.js | FileCheck test.js # Running check suite for the function shuffling option $ js-obfuscator --shuffle-funcs test.js | \ FileCheck --check-prefix=CHECK-SHUFFLE test.js
In this section, we have shown some advanced and useful FileCheck skills through our example project. These skills provide you with different ways to write validation patterns and make your LIT test script more concise. So far, we have been talking about the testing methodology, which runs tests in a shelllike environment (that is, in the ShTest LIT format). In the next section, we are going to introduce an alternative LIT framework – the TestSuite framework and testing format that was originated from the llvm-test-suite project – which provides a different kind of useful testing methodology for LIT.
42 Testing with LLVM LIT
Exploring the TestSuite framework In the previous sections, we learned how regression tests were performed in LLVM. More specifically, we looked at the ShTest testing format (recalling the config. test_format = lit.formats.ShTest(…) line), which basically runs end-to-end tests in a shell script fashion. The ShTest format provides more flexibility when it comes to validating results since it can use the FileCheck tool we introduced in the previous section, for example. This section is going to introduce another kind of testing format: TestSuite. The TestSuite format is part of the llvm-test-suite project – a collection of test suites and benchmarks created for testing and benchmarking LLVM. Similar to ShTest, this LIT format is also designed to run end-to-end tests. However, TestSuite aims to make developers' lives easier when they want to integrate existing executable-based test suites or benchmark codebases. For example, if you want to use the famous SPEC benchmark as one of your test suites, all you need to do is add a build description and the expected output in plain text. This is also useful when your testing logic cannot be expressed using a textual testing script, as we saw in previous sections. In this section, we will learn how to import an existing test suite or benchmark codebase into the llvm-test-suite project.
Preparing for our example project First, please follow the instructions at the beginning of this chapter to build llvm-testsuite. The rest of the section is going to use a pseudo test suite project called GeoDistance. The GeoDistance project uses C++ and a GNU Makefile to build a command-line tool, geo-distance, that calculates and prints out the total distance of a path constructed by a list of latitude and longitude pairs provided by the input file. It should have the following folder structure:
  GeoDistance
    |___ helper.cpp
    |___ main.cpp
    |___ sample_input.txt
    |___ Makefile
Exploring the TestSuite framework 43
Here, the Makefile looks like this:
FLAGS := -DSMALL_INPUT -ffast-math EXE := geo-distance OBJS := helper.o main.o
  %.o: %.cpp
      $(CXX) $(FLAGS) -c $^
  $(EXE): $(OBJS)
      $(CXX) $(FLAGS) $< -o $@
To run the geo-distance command-line tool, use the following command:
$ geo-distance ./sample_input.txt
This prints out the floating-point distance to stdout:
$ geo-distance ./sample_input.txt 94.873467
The floating-point precision requirement here is 0.001.
Importing code into llvm-test-suite Basically, there are only two things we need to do to import existing test suites or benchmarks into llvm-test-suite:
• Use CMake as the build system • Compose verification rules
To use CMake as the build system, the project folder needs to be put under the MultiSource/Applications subdirectory inside the llvm-test-suite source tree. Then, we need to update the enclosing CMakeLists.txt accordingly:
# Inside MultiSource/Applications/CMakeLists.txt … add_subdirectory(GeoDistance)
44 Testing with LLVM LIT
To migrate from our GNU Makefile to CMakeLists.txt, instead of rewriting it using the built-in CMake directives such as add_executable, LLVM provides some handy functions and macros for you:
# Inside MultiSource/Applications/GeoDistance/CMakeLists.txt # (Unfinished) llvm_multisource(geo-distance) llvm_test_data(geo-distance sample_input.txt)
There are some new CMake directives here. llvm_multisource and its sibling, llvm_ singlesource, add a new executable build target from multiple source files or only a single source file, respectively. They're basically add_executable, but as shown in the previous code, you can choose to leave the source file list empty, and it will use all the C/C++ source files shown in the current directory as input.
        Note
        If there are multiple source files but you're using llvm_singlesource,
        every source file will be treated as a standalone executable.
llvm_test_data copies any resource/data files you want to use during runtime to the proper working directory. In this case, it's the sample_input.txt file. Now that the skeleton has been set up, it's time to configure the compilation flags using the following code:
# Inside MultiSource/Applications/GeoDistance/CMakeLists.txt # (Continue) list(APPEND CPPFLAGS -DSMALL_INPUT) list(APPEND CFLAGS -ffast-math)
llvm_multisource(geo-distance) llvm_test_data(geo-distance sample_input.txt)
Exploring the TestSuite framework 45
Finally, TestSuite needs to know how to run the test and how to verify the result:
# Inside MultiSource/Applications/GeoDistance/CMakeLists.txt # (Continue) … set(RUN_OPTIONS sample_input.txt) set(FP_TOLERANCE 0.001) llvm_multisource(geo-distance) …
The RUN_OPTIONS CMake variable is pretty straightforward – it provides the commandline options for the testing executable. For the verification part, by default, TestSuite will use an enhanced diff to compare the output of stdout and the exit code against files whose filename end with .reference_ output. For example, in our case, a GeoDistance/geo-distance.reference_output file is created with the expected answer and exit status code:
exit 0
You might find that the expected answer here is slightly different from the output at the beginning of this section (94.873467), and that's because the comparison tool allows you to designate the desired floating-point precision, which is controlled by the FP_ TOLERANCE CMake variable shown previously. In this section, we learned how to leverage the llvm-test-suite project and its TestSuite framework to test executables that are either from an existing codebase or are unable to express testing logic using textual scripts. This will help you become more efficient in testing different kinds of projects using LIT.
46 Testing with LLVM LIT
Summary LIT is a general-purpose testing framework that can not only be used inside LLVM, but also arbitrary projects with little effort. This chapter tried to prove this point by showing you how to integrate LIT into an out-of-tree project without even needing to build LLVM. Second, we saw FileCheck – a powerful pattern checker that's used by many LIT test scripts. These skills can reinforce the expressiveness of your testing scripts. Finally, we presented you with the TestSuite framework, which is suitable for testing different kinds of program and complements the default LIT testing format. In the next chapter, we will explore another supporting framework in the LLVM project: TableGen. We will show you that TableGen is also a general toolbox that can solve problems in out-of-tree projects, albeit almost being exclusively used by backend development in LLVM nowadays.
Further reading Currently, the source code for FileCheck – written in C++ – is still inside LLVM's source tree. Try to replicate its functionality using Python (https://github.com/mullproject/FileCheck.py), which will effectively help you use FileCheck without building LLVM, just like LIT!