Ch 5 — Creating Our Own Fibers
Creating Our Own Fibers In this chapter, we take a deep dive into a very popular way of handling concurrency. There is no better way of getting a fundamental understanding of the subject than doing it yourself. Fortunately, even though the topic is a little complex, we only need around 200 lines of code to get a fully working example in the end. What makes the topic complex is that it requires quite a bit of fundamental understanding of how CPUs, operating systems, and assembly work. This complexity is also what makes this topic so interesting. If you explore and work through this example in detail, you will be rewarded with an eye-opening understanding of topics you might only have heard about or only have a rudimentary understanding of. You will also get the chance to get to know a few aspects of the Rust language that you haven’t seen before, expanding your knowledge of both Rust and programming in general. We start off by introducing a little background knowledge that we need before we start writing code. Once we have that in place, we’ll start with some small examples that will allow us to show and discuss the most technical and difficult parts of our example in detail so we can introduce the topics gradually. Lastly, we’ll build on the knowledge we’ve gained and create our main example, which is a working example of fibers implemented in Rust. As a bonus, you’ll get two expanded versions of the example in the repository to inspire you to go on and change, adapt, and build upon what we’ve created to make it your own. I’ll list the main topics here so you can refer to them later on:
• How to use the repository alongside the book • Background information • An example we can build upon • The stack • Implementing our own fibers • Final thoughts
96 Creating Our Own Fibers
        Note
        In this chapter, we’ll use the terms “fibers” and “green threads” to refer to this exact implementation
        of stackful coroutines. The term “threads” in this chapter, which is used in the code we write,
        will refer to the green threads/fibers we implement in our example and not OS threads.
     Technical requirements
     To run the examples, you will need a computer running on a CPU using the x86-64 instruction set.
     Most popular desktop, server, and laptop CPUs out there today use this instruction set, as do most
     modern CPUs from Intel and AMD (which are most CPU models from these manufacturers produced
     in the last 10–15 years).
     One caveat is that the modern M-series Macs use the ARM ISA (instruction set), which won’t be
     compatible with the examples we write here. However, older Intel-based Macs do, so you should be
     able to use a Mac to follow along if you don’t have the latest version.
     If you don’t have a computer using this instruction set available, you have a few options to install Rust
     and run the examples:
        • Mac users on M-series chips can use Rosetta (which ships with newer MacOS versions) and get
          the examples working with just four simple steps. You’ll find the instructions in the repository
          under ch05/How-to-MacOS-M.md.
        • https://mac.getutm.app/Rent (some even have a free layer) a remote server running
          Linux on x86-64. I have experience with Linode’s offering (https://www.linode.com/),
          but there are many more options out there.
     To follow along with the examples in the book, you also need a Unix-based operating system. The
     example code will work natively on any Linux and BSD operating system (such as Ubuntu or macOS)
     as long as it’s running on an x86-64 CPU.
     If you’re on Windows, there is a version of the example in the repository that works natively with
     Windows too, but to follow along with the book, my clear recommendation is to set up Windows
     Subsystem for Linux (WSL) (https://learn.microsoft.com/en-us/windows/wsl/
     install), install Rust, and follow along using Rust on WSL.
     I personally use VS Code as my editor, as it makes it very easy to switch between using a Linux version
     on WSL and Windows—simply press Ctrl + Shift + P and search for the Reopen folder in WSL.
     How to use the repository alongside the book
     The recommended way to read this chapter is to have the repository open alongside the book. In
     the repository, you’ll find three different folders that correspond to the examples we go through in
     this chapter:
• ch05/a-stack swap
Background information 97
• ch05/b-show-stack • ch05/c-fibers
In addition, you will get two more examples that I refer to in the book but that should be explored in the repository:
   • ch05/d-fibers-closure: This is an extended version of the first example that might
     inspire you to do more complex things yourself. The example tries to mimic the API used in
     the Rust standard library using std::thread::spawn.
   • ch05/e-fibers-windows: This is a version of the example that we go through in this book
     that works on both Unix-based systems and Windows. There is a quite detailed explanation
     in the README of the changes we make for the example work on Windows. I consider this
     recommended reading if you want to dive deeper into the topic, but it’s not important to
     understand the main concepts we go through in this chapter.
Background information We are going to interfere with and control the CPU directly. This is not very portable since there are many kinds of CPUs out there. While the overall implementation will be the same, there is a small but important part of the implementation that will be very specific to the CPU architecture we’re programming for. Another aspect that limits the portability of our code is that operating systems have different ABIs that we need to adhere to, and those same pieces of code will have to change based on the different ABIs. Let’s explain exactly what we mean here before we go further so we know we’re on the same page.
Instruction sets, hardware architectures, and ABIs Okay, before we start, we need to know the differences between an application binary interface (ABI), a CPU architecture, and an instruction set architecture (ISA). We need this to write our own stack and make the CPU jump over to it. Fortunately, while this might sound complex, we only need to know a few specific things for our example to run. The information presented here is useful in many more circumstances than just our example, so it’s worthwhile to cover it in some detail. An ISA describes an abstract model of a CPU that defines how the CPU is controlled by the software it runs. We often simply refer to this as the instruction set, and it defines what instructions the CPU can execute, what registers programmers can use, how the hardware manages memory, etc. Examples of ISAs are x86-64, x86, and the ARM ISA (used in Mac M-series chips). ISAs are broadly classified into two subgroups, complex instruction set computers (CISC) and reduced instruction set computers (RISC), based on their complexity. CISC architectures offer a lot of different instructions that the hardware must know how to execute, resulting in some instructions that are very specialized and rarely used by programs. RISC architectures accept fewer instructions
98 Creating Our Own Fibers
     but require some operations to be handled by software that could be directly handled by the hardware
     in a CISC architecture. The x86-64 instruction set we’ll focus on is an example of a CISC architecture.
     To add a little complexity (you know, it’s not fun if it’s too easy), there are different names that refer
     to the same ISA. For example, the x86-64 instruction set is also referred to as the AMD64 instruction
     set and the Intel 64 instruction set, so no matter which one you encounter, just know that they refer
     to the same thing. In our book, we’ll simply call it the x86-64 instruction set.
        Tip
        To find the architecture on your current system, run one of the following commands in
        your terminal:
        On Linux and MacOS: arch or uname -m
        On Windows PowerShell: $env:PROCESSOR_ARCHITECTURE
        On Windows Command Prompt: echo %PROCESSOR_ARCHITECTURE%
     The instruction set just defines how a program can interface with the CPU. The concrete implementation
     of an ISA can vary between different manufacturers, and a specific implementation is referred to as
     a CPU architecture, such as Intel Core processors. However, in practice, these terms are often used
     interchangeably since they all perform the same functions from a programmer’s perspective and there
     is seldom a need to target a specific implementation of an ISA.
     The ISA specifies the minimum set of instructions the CPU must be able to execute. Over time, there
     have been extensions to this instruction set, such as Streaming SIMD Extensions (SSE), that add
     more instructions and registers that programmers can take advantage of.
     For the examples in this chapter, we will target the x86-64 ISA, a popular architecture used in most
     desktop computers and servers today.
     So, we know that a processor architecture presents an interface that programmers can use. Operating
     system implementors use this infrastructure to create operating systems.
     Operating systems such as Windows and Linux define an ABI that specifies a set of rules that the
     programmer has to adhere to for their programs to work correctly on that platform. Examples of
     operating system ABI’s are System V ABI (Linux) and Win64 (Windows). The ABI specifies how the
     operating system expects a stack to be set up, how you should call a function, how you create a file
     that will load and run as a program, the name of the function that will be called once the program
     has loaded, etc.
     A very important part of the ABI that operating systems must specify is its calling convention. The
     calling convention defines how the stack is used and how functions are called.
     Let’s illustrate this with an example of how Linux and Windows handle arguments to a function on
     x86-64; for example, a function with a signature such as fn foo(a: i64, b: i64).
Background information 99
The x86-64 ISA defines 16 general-purpose registers. These are registers the CPU provides for programmers to use for whatever they see fit. Note that programmers here include the ones that write the operating system, and they can lay additional restrictions on what registers you can use for what when you create a program to run on their operating system. In our specific example, Windows and Unix-based systems have different requirements for where to place the arguments for a function:
• Linux specifies that a function that takes two arguments should place the first argument to the function in the rdi register and the second one in the rsi register • Windows requires that the first two arguments be passed in the registers rcx and rdx
This is just one of many ways in which a program that is written for one platform won’t work on another. Usually, these details are the concern of compiler developers, and the compiler will handle the different calling conventions when you compile for a specific platform. So to sum it up, CPUs implement an instruction set. The instruction set defines what instructions the CPU can execute and the infrastructure it should provide to programmers (such as registers). An operating system uses this infrastructure in different ways, and it provides additional rules that a programmer must obey to run their program correctly on their platform. Most of the time, the only programmers that need to care about these details are the ones who write operating systems or compilers. However, when we write low-level code ourselves, we need to know about the ISA and the OS ABI to have our code work correctly. Since we need to write this kind of code to implement our own fibers/green threads, we must potentially write different code for each OS ABI/ISA combination that exists. That means one for Windows/ x86-64, one for Windows/ARM, one for MacOS/x86-64, one for Macos/M, etc. As you understand, this is also one major contributor to the complexity of using fibers/green threads for handling concurrency. It has a lot of advantages once it’s correctly implemented for an ISA/OS ABI combination, but it requires a lot of work to get it right. For the purpose of the examples in this book, we will only focus on one such combination: the System V ABI for x86-64.
Note! In the accompanying repository, you will find a version of the main example for this chapter for Windows x86-64. The changes we have to make to make it work on Windows are explained in the README.
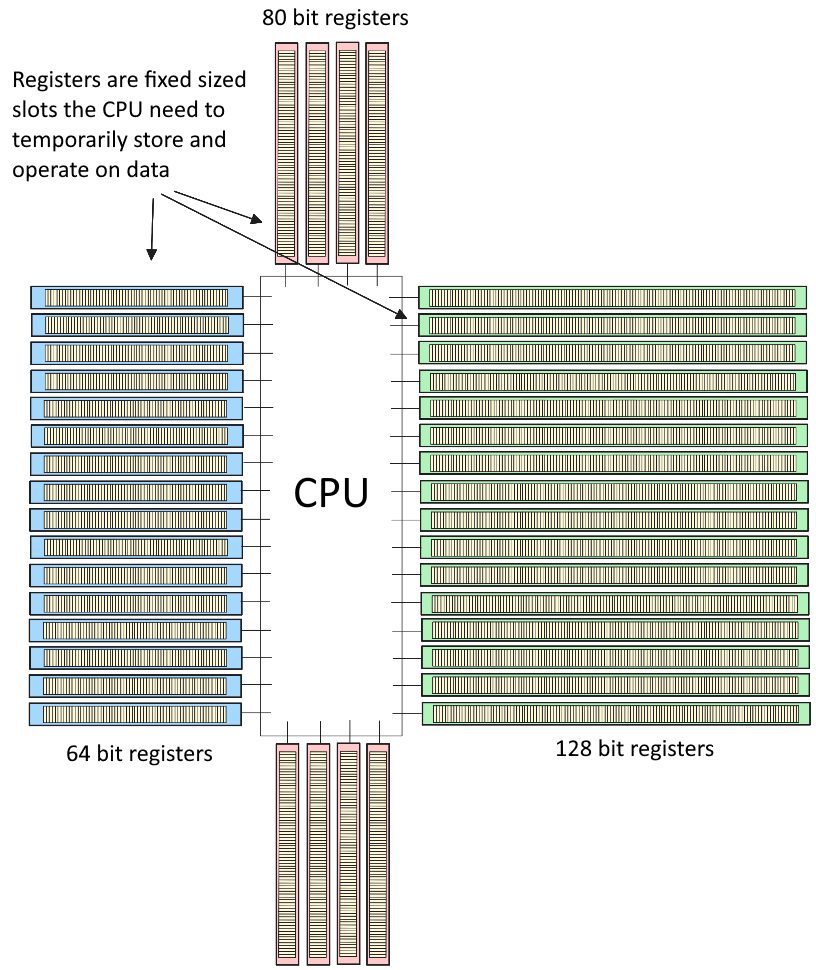
The System V ABI for x86-64 As mentioned earlier, this architecture of the CPU features a set of 16 general-purpose 64-bit registers, 16 SSE registers with 128-bit width, and 8 floating point registers with 80-bit width:
100 Creating Our Own Fibers
Figure 5.1 – x86-64 CPU registers
      There are architectures that build upon this base and extend it, such as the Intel Advanced Vector
      Extensions (AVX), which provide an additional 16 registers of 256 bits in width. Let’s take a look at
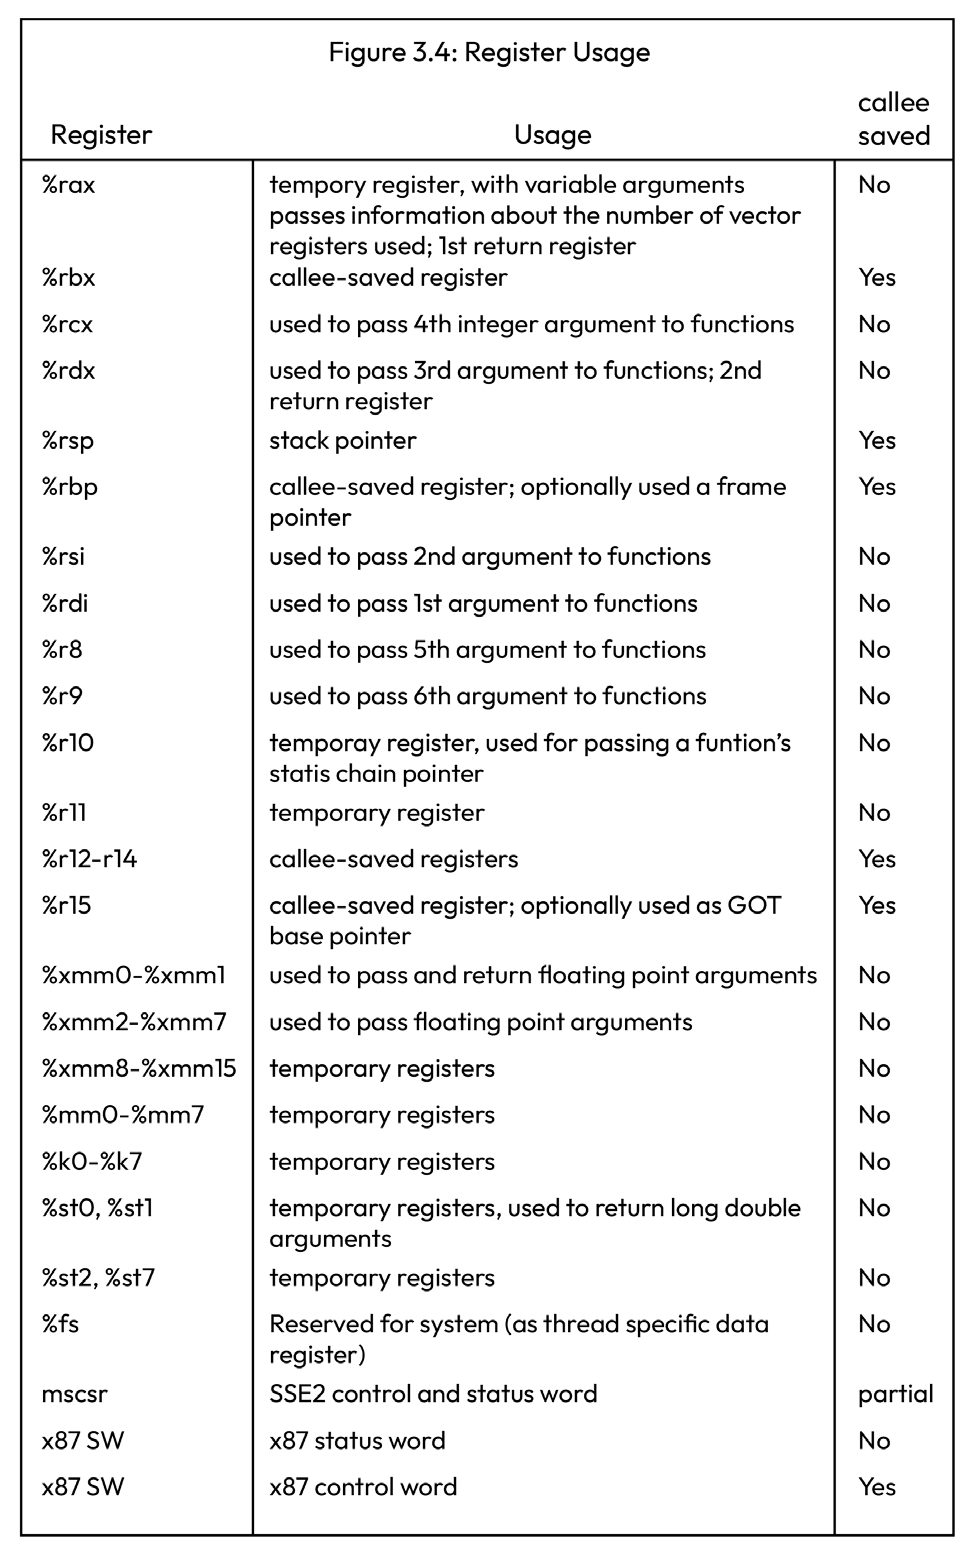
      a page from the System V ABI specification:
Background information 101
Figure 5.2 – Register usage
Figure 5.1 shows an overview of the general-purpose registers in the x86-64 architecture. Out of special interest for us right now are the registers marked as callee saved. These are the registers we need to keep track of our context across function calls. It includes the next instructions to run, the base pointer, the stack pointer, and so on. While the registers themselves are defined by the ISA, the rules on what is considered callee saved are defined by the System V ABI. We’ll get to know this more in detail later.
Note Windows has a slightly different convention. On Windows, the register XMM6:XMM15 is also calle-saved and must be saved and restored if our functions use them. The code we write in this first example runs fine on Windows since we don’t really adhere to any ABI yet and just focus on how we’ll instruct the CPU to do what we want.
102 Creating Our Own Fibers
      If we want to issue a very specific set of commands to the CPU directly, we need to write small pieces
      of code in assembly. Fortunately, we only need to know some very basic assembly instructions for our
      first mission. Specifically, we need to know how to move values to and from registers:
        mov rax, rsp
      A quick introduction to Assembly language
      First and foremost, Assembly language isn’t particularly portable since it’s the lowest level of human-
      readable instructions we can write to the CPU, and the instructions we write in assembly will vary
      from architecture to architecture. Since we will only write assembly targeting the x86-64 architecture
      going forward, we only need to learn a few instructions for this particular architecture.
      Before we go too deep into the specifics, you need to know that there are two popular dialects used
      in assembly: the AT&T dialect and the Intel dialect.
      The Intel dialect is the standard when writing inline assembly in Rust, but in Rust, we can specify
      that we want to use the AT&T dialect instead if we want to. Rust has its own take on how to do inline
      assembly that at first glance looks foreign to anyone used to inline assembly in C. It’s well thought
      through though, and I’ll spend a bit of time explaining it in more detail as we go through the code, so
      both readers with experience with the C-type inline assembly and readers who have no experience
      should be able to follow along.
         Note
         We will use the Intel dialect in our examples.
      Assembly has strong backward compatibility guarantees. That’s why you will see that the same registers
      are addressed in different ways. Let’s look at the rax register we used as an example as an explanation:
        rax    # 64 bit register (8 bytes)
        eax    # 32 low bits of the "rax" register
        ax     # 16 low bits of the "rax" register
        ah     # 8 high bits of the "ax" part of the "rax" register
        al     # 8 low bits of the "ax" part of the "rax" register
      As you can see, this is basically like watching the history of CPUs evolve in front of us. Since most
      CPUs today are 64 bits, we will use the 64-bit versions in our code.
      The word size in the assembly also has historical reasons. It stems from the time when the CPU had
      16-bit data buses, so a word is 16 bits. This is relevant because you will see many instructions suffixed
      with q (quad word) or l (long word). So, a movq would mean a move of 4 * 16 bits, which is 64 bits.
      A plain mov will use the size of the register you target on most modern assemblers. This is the one
      you will see most used in both AT&T and the Intel dialect when writing inline assembly, and it’s the
      one we will use in our code.
An example we can build upon 103
One more thing to note is that the stack alignment on x86-64 is 16 bytes. Just remember this for later.
An example we can build upon This is a short example where we will create our own stack and make our CPU return out of its current execution context and over to the stack we just created. We will build on these concepts in the following chapters.
Setting up our project First, let’s start a new project by creating a folder named a-stack-swap. Enter the new folder and run the following: cargo init
Tip You can also navigate to the folder called ch05/a-stack-swap in the accompanying repository and see the whole example there.
In our main.rs, we start by importing the asm! macro:
ch05/a-stack-swap/src/main.rs use core::arch::asm;
Let’s set a small stack size of only 48 bytes here so that we can print the stack and look at it before we switch contexts after we get the first example to work: const SSIZE: isize = 48;
Note There seems to be an issue in macOS using such a small stack. The minimum for this code to run is a stack size of 624 bytes. The code works on the Rust Playground, at https://play. rust-lang.org, if you want to follow this exact example (however, you’ll need to wait roughly 30 seconds for it to time out due to our loop in the end).
Then let’s add a struct that represents our CPU state. We’ll only focus on the register that stores the stack pointer for now since that is all we need: #[derive(Debug, Default)] #[repr(C)] struct ThreadContext { rsp: u64, }
104 Creating Our Own Fibers
      In later examples, we will use all the registers marked as callee saved in the specification document
      I linked to. These are the registers described in the System V x86-64 ABI that we’ll need to save our
      context, but right now, we only need one register to make the CPU jump over to our stack.
      Note that this needs to be #[repr(C)] because of how we access the data in our assembly. Rust
      doesn’t have a stable language ABI, so there is no way for us to be sure that this will be represented in
      memory with rsp as the first 8 bytes. C has a stable language ABI and that’s exactly what this attribute
      tells the compiler to use. Granted, our struct only has one field right now, but we will add more later.
      For this very simple example, we will define a function that just prints out a message and then
      loops forever:
        fn hello() -> ! {
            println!("I LOVE WAKING UP ON A NEW STACK!");
            loop {}
        }
      Next up is our inline assembly, where we switch over to our own stack:
        unsafe fn gt_switch(new: *const ThreadContext) {
            asm!(
                "mov rsp, [{0} + 0x00]",
                "ret",
                in(reg) new,
            );
        }
      At first glance, you might think that there is nothing special about this piece of code, but let’s stop and
      consider what happens here for a moment.
      If we refer back to Figure 5.1, we’ll see that rsp is the register that stores the stack pointer that the
      CPU uses to figure out the current location on the stack.
      Now, what we actually want to do if we want the CPU to swap to a different stack is to set the register
      for the stack pointer (rsp) to the top of our new stack and set the instruction pointer (rip) on the
      CPU to point to the address hello.
      The instruction pointer, or program counter as it’s sometimes called on different architectures, points
      to the next instruction to run. If we can manipulate it directly, the CPU would fetch the instruction
      pointed to by the rip register and execute the first instruction we wrote in our hello function. The
      CPU will then push/pop data on the new stack using the address pointed to by the stack pointer and
      simply leave our old stack as it was.
      Now, this is where it gets a little difficult. On the x86-64 instruction set, there is no way for us to
      manipulate rip directly, so we have to use a little trick.
An example we can build upon 105
The first thing we do is set up the new stack and write the address to the function we want to run at a 16-byte offset from the top of the stack (the ABI dictates a 16-byte stack alignment, so the top of our stack frame must start at a 16-byte offset). We’ll see how to create a continuous piece of memory a little later, but it’s a rather straightforward process. Next, we pass the address of the first byte in which we stored this address on our newly created stack to the rsp register (the address we set to new.rsp will point to an address located on our own stack, which in turn is an address that leads to the hello function). Got it? The ret keyword transfers program control to what would normally be the return address located on top of the stack frame it’s currently in. Since we placed the address to hello on our new stack and set the rsp register to point to our new stack, the CPU will think rsp now points to the return address of the function it’s currently running, but instead, it’s pointing to a location on our new stack. When the CPU executes the ret instruction it will pop the first value of the stack (which is conveniently the address to our hello function) and place that address in the rip register for us. On the next cycle, the CPU will fetch the instructions located at that function pointer and start executing those instructions. Since rsp now points to our new stack, it will use that stack going forward.
Note If you feel a little confused right now, that’s very understandable. These details are hard to understand and get right, and it takes time to get comfortable with how it works. As we’ll see later in this chapter, there is a little more data that we need to save and restore (right now, we don’t have a way to resume the stack we just swapped from), but the technical details on how the stack swap happens are the same as described previously.
Before we explain how we set up the new stack, we’ll use this opportunity to go line by line and explain how the inline assembly macro works.
An introduction to Rust inline assembly macro We’ll use the body of our gt_switch function as a starting point by going through everything step by step. If you haven’t used inline assembly before, this might look foreign, but we’ll use an extended version of the example later to switch contexts, so we need to understand what’s going on. unsafe is a keyword that indicates that Rust cannot enforce the safety guarantees in the function we write. Since we are manipulating the CPU directly, this is most definitely unsafe. The function will also take a pointer to an instance of our ThreadContext from which we will only read one field: unsafe gt_switch(new: *const ThreadContext)
106 Creating Our Own Fibers
      The next line is the asm! macro in the Rust standard library. It will check our syntax and provide an
      error message if it encounters something that doesn’t look like valid Intel (by default) assembly syntax.
        asm!(
      The first thing the macro takes as input is the assembly template:
        "mov rsp, [{0} + 0x00]",
      This is a simple instruction that moves the value stored at 0x00 offset (that means no offset at all in
      hex) from the memory location at {0} to the rsp register. Since the rsp register usually stores a
      pointer to the most recently pushed value on the stack, we effectively push the address to hello on
      top of the current stack so that the CPU will return to that address instead of resuming where it left
      off in the previous stack frame.
         Note
         Note that we don’t need to write [{0} + 0x00] when we don’t want an offset from the
         memory location. Writing mov rsp, [{0}] would be perfectly fine. However, I chose to
         introduce how we do an offset here as we’ll need it later on when we want to access more fields
         in our ThreadContext struct.
      Note that the Intel syntax is a little backward. You might be tempted to think mov a, b means
      “move what’s at a to b”, but the Intel dialect usually dictates that the destination register is first and
      the source is second.
      To make this confusing, this is the opposite of what’s typically the case with the AT&T syntax, where
      reading it as “move a to b” is the correct thing to do. This is one of the fundamental differences
      between the two dialects, and it’s useful to be aware of.
      You will not see {0} used like this in normal assembly. This is part of the assembly template and is
      a placeholder for the value passed as the first parameter to the macro. You’ll notice that this closely
      matches how string templates are formatted in Rust using println! or the like. The parameters
      are numbered in ascending order starting from 0. We only have one input parameter here, which
      corresponds to {0}.
      You don’t really have to index your parameters like this; writing {} in the correct order would suffice
      (as you would do using the println! macro). However, using an index improves readability and I
      would strongly recommend doing it that way.
      The [] basically means “get what’s at this memory location”, you can think of it as the same as
      dereferencing a pointer.
An example we can build upon 107
Let’s try to sum up what we do here with words: Move what’s at the + 0x00 offset from the memory location that {compiler_chosen_general_ purpose_register} points to to the rsp register. The next line is the ret keyword, which instructs the CPU to pop a memory location off the stack and then makes an unconditional jump to that location. In effect, we have hijacked our CPU and made it return to our stack. Next up is the first non-assembly argument to the asm! macro is our input parameter: in(reg) new,
When we write in(reg), we let the compiler decide on a general-purpose register to store the value of new. out(reg) means that the register is an output, so if we write out(reg) new, we need new to be mut so we can write a value to it. You’ll also find other versions such as inout and lateout.
Options
The last thing we need to introduce to get a minimal understanding of Rust’s inline assembly for now is the options keyword. After the input and output parameters, you’ll often see something like options(att_syntax), which specifies that the assembly is written with the AT&T syntax instead of the Intel syntax. Other options include pure, nostack, and several others. I’ll refer you to the documentation for you to read about them since they’re explained in detail there: https://doc.rust-lang.org/nightly/reference/inline-assembly. html#options Inline assembly is quite complex, so we’ll take this step by step and introduce more details on how it works along the way through our examples.
Running our example The last bit we need is the main function to run our example. I’ll present the whole function and we’ll walk through it step by step: fn main() { let mut ctx = ThreadContext::default(); let mut stack = vec![0_u8; SSIZE as usize];
      unsafe {
          let stack_bottom = stack.as_mut_ptr().offset(SSIZE);
          let sb_aligned = (stack_bottom as usize & !15) as *mut u8;
          std::ptr::write(sb_aligned.offset(-16) as *mut u64, hello as u64);
          ctx.rsp = sb_aligned.offset(-16) as u64;
          gt_switch(&mut ctx);
108 Creating Our Own Fibers
            }
        }
      So, in this function, we’re actually creating our new stack. hello is a pointer already (a function
      pointer), so we can cast it directly as an u64 since all pointers on 64-bit systems will be, well, 64-bit.
      Then, we write this pointer to our new stack.
         Note
         We’ll talk more about the stack in the next segment, but one thing we need to know now is that
         the stack grows downwards. If our 48-byte stack starts at index 0 and ends on index 47, index
         32 will be the first index of a 16-byte offset from the start/base of our stack.
Make note that we write the pointer to an offset of 16 bytes from the base of our stack.
         What does the line let sb_aligned = (stack_bottom as usize &! 15) as *mut u8; do?
         When we ask for memory like we do when creating a Vec<u8>, there is no guarantee that
         the memory we get is 16-byte-aligned when we get it. This line of code essentially rounds our
         memory address down to the nearest 16-byte-aligned address. If it’s already 16 byte-aligned,
         it does nothing. This way, we know that we end up at a 16-byte-aligned address if we simply
         subtract 16 from the base of our stack.
      We cast the address to hello as a pointer to a u64 instead of a pointer to a u8. We want to write to
      position “32, 33, 34, 35, 36, 37, 38, 39”, which is the 8-byte space we need to store our u64. If we don’t
      do this cast, we try to write a u64 only to position 32, which is not what we want.
      When we run the example by writing cargo run in our terminal, we get:
        Finished dev [unoptimized + debuginfo] target(s) in 0.58s
        Running `target\debug\a-stack-swap`
        I LOVE WAKING UP ON A NEW STACK!
         Tip
         As we end the program in an endless loop, you’ll have to exit by pressing Ctrl + C.
      OK, so what happened? We didn’t call the function hello at any point, but it still executed.
      What happened is that we actually made the CPU jump over to our own stack, and since it thinks
      it returns from a function, it will read the address to hello and start executing the instructions it
      points to. We have taken the first step toward implementing a context switch.
The stack 109
In the next sections, we will talk about the stack in a bit more detail before we implement our fibers. It will be easier now that we have covered so much of the basics.
The stack A stack is nothing more than a piece of contiguous memory. This is important to know. A computer only has memory, it doesn’t have a special stack memory and a heap memory; it’s all part of the same memory. The difference is how this memory is accessed and used. The stack supports simple push/pop instructions on a contiguous part of memory, that’s what makes it fast to use. The heap memory is allocated by a memory allocator on demand and can be scattered around in different locations. We’ll not go through the differences between the stack and the heap here since there are numerous articles explaining them in detail, including a chapter in The Rust Programming Language at https:// doc.rust-lang.org/stable/book/ch04-01-what-is-ownership.html#thestack-and-the-heap.
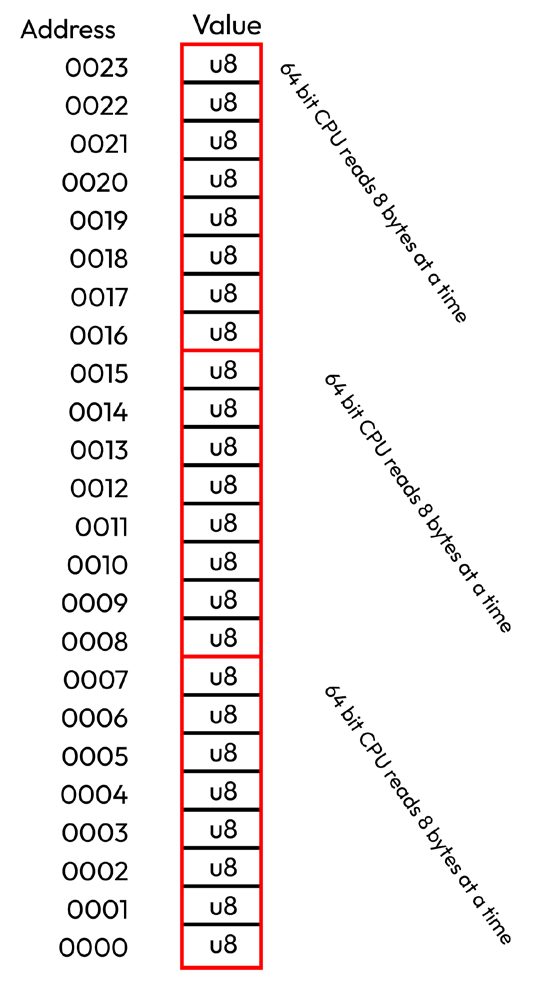
What does the stack look like? Let’s start with a simplified view of the stack. A 64-bit CPU will read 8 bytes at a time. Even though the natural way for us to see a stack is a long line of u8 as shown in Figure 5.2, the CPU will treat it more like a long line of u64 instead since it won’t be able to read less than 8 bytes when it makes a load or a store.
Figure 5.3 – The stack
110 Creating Our Own Fibers
      When we pass a pointer, we need to make sure we pass in a pointer to either address 0016, 0008,
      or 0000 in the example.
      The stack grows downwards, so we start at the top and work our way down.
      When we set the stack pointer in a 16-byte aligned stack, we need to make sure to put our stack pointer
      to an address that is a multiple of 16. In the example, the only address that satisfies this requirement
      is 0008 (remember the stack starts on the top).
      If we add the following lines of code to our example in the last chapter just before we do the switch
      in our main function, we can effectively print out our stack and have a look at it:
      ch05/b-show-stack
        for i in 0..SSIZE {
            println!("mem: {}, val: {}",
            sb_aligned.offset(-i as isize) as usize,
            *sb_aligned.offset(-i as isize))
        }
      The output we get is as follows:
        mem: 2643866716720, val: 0
        mem: 2643866716719, val: 0
        mem: 2643866716718, val: 0
        mem: 2643866716717, val: 0
        mem: 2643866716716, val: 0
        mem: 2643866716715, val: 0
        mem: 2643866716714, val: 0
        mem: 2643866716713, val: 0
        mem: 2643866716712, val: 0
        mem: 2643866716711, val: 0
        mem: 2643866716710, val: 0
        mem: 2643866716709, val: 127
        mem: 2643866716708, val: 247
        mem: 2643866716707, val: 172
        mem: 2643866716706, val: 15
        mem: 2643866716705, val: 29
        mem: 2643866716704, val: 240
        mem: 2643866716703, val: 0
        mem: 2643866716702, val: 0
        mem: 2643866716701, val: 0
        mem: 2643866716700, val: 0
        mem: 2643866716699, val: 0
The stack 111
mem: 2643866716675, val: 0 mem: 2643866716674, val: 0 mem: 2643866716673, val: 0 I LOVE WAKING UP ON A NEW STACK!
I’ve printed out the memory addresses as u64 here, so it’s easier to parse if you’re not very familiar with hex. The first thing to note is that this is just a contiguous piece of memory, starting at address 2643866716673 and ending at 2643866716720. The addresses 2643866716704 to 2643866716712 are of special interest to us. The first address is the address of our stack pointer, the value we write to the rsp register of the CPU. The range represents the values we wrote to the stack before we made the switch.
Note The actual addresses you get will be different every time you run the program.
In other words, the values 240, 205, 252, 56, 67, 86, 0, 0 represent the pointer to our hello() function written as u8 values.
Endianness An interesting side note here is that the order the CPU writes an u64 as a set of 8 u8 bytes is dependent on its endianness. In other words, a CPU can write our pointer address as 240, 205, 252, 56, 67, 86, 0, 0 if it’s little-endian or 0, 0, 86, 67, 56, 252, 205, 240 if it’s big-endian. Think of it like how Hebrew, Arabic, and Persian languages read and write from right to left, while Latin, Greek, and Indic languages read and write from left to right. It doesn’t really matter as long as you know it in advance, and the results will be the same.
The x86-64 architecture uses a little-endian format, so if you try to parse the data manually, you’ll have to bear this in mind.
As we write more complex functions, our extremely small 48-byte stack will soon run out of space. You see, as we run the functions we write in Rust, the CPU will now push and pop values on our new stack to execute our program and it’s left to the programmer to make sure they don’t overflow the stack. This brings us to our next topic: stack sizes.
Stack sizes We touched upon this topic earlier in Chapter 2, but now that we’ve created our own stack and made our CPU jump over to it, you might get a better sense of the issue. One of the advantages of creating our own green threads is that we can freely choose how much space we reserve for each stack.
112 Creating Our Own Fibers
      When you start a process in most modern operating systems, the standard stack size is normally 8 MB,
      but it can be configured differently. This is enough for most programs, but it’s up to the programmer
      to make sure we don’t use more than we have. This is the cause of the dreaded stack overflow that
      most of us have experienced.
      However, when we can control the stacks ourselves, we can choose the size we want. 8 MB for each
      task is way more than we need when running simple functions in a web server, for example, so by
      reducing the stack size, we can have millions of fibers/green threads running on a machine. We run
      out of memory a lot sooner using stacks provided by the operating system.
      Anyway, we need to consider how to handle the stack size, and most production systems such as
      Boost.Coroutine or the one you find in Go will use either segmented stacks or growable stacks. We
      will make this simple for ourselves and use a fixed stack size going forward.
      Implementing our own fibers
      Before we start, I want to make sure you understand that the code we write is quite unsafe and is not
      a “best practice” when writing Rust. I want to try to make this as safe as possible without introducing
      a lot of unnecessary complexity, but there is no way to avoid the fact that there will be a lot of unsafe
      code in this example. We will also prioritize focusing on how this works and explain it as simply as
      possible, which will be enough of a challenge in and of itself, so the focus on best practices and safety
      will have to take the back seat on this one.
      Let’s start off by creating a whole new project called c-fibers and removing the code in main.
      rs so we start with a blank sheet.
         Note
         You will also find this example in the repository under the ch05/c-fibers folder. This
         example, as well as ch05/d-fibers-closure and ch05/e-fibers-windows,
         needs to be compiled using the nightly compiler since we use an unstable feature. You can do
         this in one of two ways:
         • Override the default toolchain for the entire directory you’re in by writing rustup override
         set nightly (I personally prefer this option).
         • Tell cargo to use the nightly toolchain every time you compile or run the program using
         cargo +nightly run.
         We’ll create a simple runtime with a very simple scheduler. Our fibers will save/restore their state
         so they can be stopped and resumed at any point during execution. Each fiber will represent
         a task that we want to progress concurrently, and we simply create a new fiber for each task
         we want to run.
Implementing our own fibers 113
We start off the example by enabling a specific feature we need, importing the asm macro, and defining a few constants:
ch05/c-fibers/main.rs #![feature(naked_functions)] use std::arch::asm;
const DEFAULT_STACK_SIZE: usize = 1024 * 1024 * 2; const MAX_THREADS: usize = 4; static mut RUNTIME: usize = 0;
The feature we want to enable is called the naked_functions feature. Let’s explain what a naked function is right away.
Naked functions If you remember when we talked about the operating system ABI and calling conventions earlier, you probably remember that each architecture and OS have different requirements. This is especially important when creating new stack frames, which is what happens when you call a function. So, the compiler knows about what each architecture/OS requires and adjusts layout, and parameter placement on the stack and saves/restores certain registers to make sure we satisfy the ABI on the platform we’re on. This happens both when we enter and exit a function and is often called a function prologue and epilogue. In Rust, we can enable this feature and mark a function as #[naked]. A naked function tells the compiler that we don’t want it to create a function prologue and epilogue and that we want to take care of this ourselves. Since we do the trick where we return over to a new stack and want to resume the old one at a later point we don’t want the compiler to think it manages the stack layout at these points. It worked in our first example since we never switched back to the original stack, but it won’t work going forward.
Our DEFAULT_STACK_SIZE is set to 2 MB, which is more than enough for our use. We also set MAX_THREADS to 4 since we don’t need more for our example. The last static constant, RUNTIME, is a pointer to our runtime (yeah, I know, it’s not pretty with a mutable global variable, but it’s making it easier for us to focus on the important parts of the example later on). The next thing we do is set up some data structures to represent the data we’ll be working with: pub struct Runtime { threads: Vec<Thread>, current: usize, }
114 Creating Our Own Fibers
        #[derive(PartialEq, Eq, Debug)]
        enum State {
            Available,
            Running,
            Ready,
        }
        struct Thread {
            stack: Vec<u8>,
            ctx: ThreadContext,
            state: State,
        }
        #[derive(Debug, Default)]
        #[repr(C)]
        struct ThreadContext {
            rsp: u64,
            r15: u64,
            r14: u64,
            r13: u64,
            r12: u64,
            rbx: u64,
            rbp: u64,
        }
      Runtime is going to be our main entry point. We are basically going to create a very small runtime
      with a very simple scheduler and switch between our threads. The runtime holds an array of Thread
      structs and a current field to indicate which thread we are currently running.
      Thread holds data for a thread. The stack is similar to what we saw in our first example in earlier
      chapters. The ctx field is a context representing the data our CPU needs to resume where it left off
      on a stack and a state field that holds our thread state.
      State is an enum representing the states our threads can be in:
         • Available means the thread is available and ready to be assigned a task if needed
         • Running means the thread is running
         • Ready means the thread is ready to move forward and resume execution
ThreadContext holds data for the registers that the CPU needs to resume execution on a stack.
Implementing our own fibers 115
Note The registers we save in our ThreadContext struct are the registers that are marked as callee saved in Figure 5.1. We need to save these since the ABI states that the callee (which will be our switch function from the perspective of the OS) needs to restore them before the caller is resumed.
Next up is how we initialize the data to a newly created thread:
  impl Thread {
      fn new() -> Self {
          Thread {
              stack: vec![0_u8; DEFAULT_STACK_SIZE],
              ctx: ThreadContext::default(),
              state: State::Available,
          }
      }
  }
This is pretty easy. A new thread starts in the Available state, indicating it is ready to be assigned a task. One thing I want to point out here is that we allocate our stack here. That is not needed and is not an optimal use of our resources since we allocate memory for threads we might need instead of allocating on first use. However, this lowers the complexity in the parts of our code that have a more important focus than allocating memory for our stack.
Note Once a stack is allocated it must not move! No push() on the vector or any other methods that might trigger a reallocation. If the stack is reallocated, any pointers that we hold to it are invalidated. It’s worth mentioning that Vec<T> has a method called into_boxed_slice(), which returns a reference to an allocated slice Box<[T]>. Slices can’t grow, so if we store that instead, we can avoid the reallocation problem. There are several other ways to make this safer, but we’ll not focus on those in this example.
Implementing the runtime The first thing we need to do is to initialize a new runtime to a base state. The next code segments all belong to the impl Runtime block, and I’ll make sure to let you know when the block ends since it can be hard to spot the closing bracket when we divide it up as much as we do here.
116 Creating Our Own Fibers
      The first thing we do is to implement a new function on our Runtime struct:
        impl Runtime {
          pub fn new() -> Self {
            let base_thread = Thread {
              stack: vec![0_u8; DEFAULT_STACK_SIZE],
              ctx: ThreadContext::default(),
              state: State::Running,
            };
            let mut threads = vec![base_thread];
            let mut available_threads: Vec<Thread> = (1..MAX_THREADS).map(|_| Thread::new()).
        collect();
            threads.append(&mut available_threads);
            Runtime {
              threads,
              current: 0,
            }
          }
      When we instantiate our Runtime, we set up a base thread. This thread will be set to the Running
      state and will make sure we keep the runtime running until all tasks are finished.
      Then, we instantiate the rest of the threads and set the current thread (the base thread) to 0.
      The next thing we do is admittedly a little bit hacky since we do something that’s usually a no-go in
      Rust. As I mentioned when we went through the constants, we want to access our runtime struct
      from anywhere in our code so that we can call yield on it at any point in our code. There are ways
      to do this safely, but the topic at hand is already complex, so even though we’re juggling with knives
      here, I will do everything I can to keep everything that’s not the main focal point of this example as
      simple as it can be.
      After we call initialize on the Runtime, we have to make sure we don’t do anything that can invalidate
      the pointer we take to self once it’s initialized.
            pub fn init(&self) {
                unsafe {
                    let r_ptr: *const Runtime = self;
                    RUNTIME = r_ptr as usize;
                }
            }
Implementing our own fibers 117
This is where we start running our runtime. It will continually call t_yield() until it returns
false, which means that there is no more work to do and we can exit the process:
      pub fn run(&mut self) -> ! {
          while self.t_yield() {}
          std::process::exit(0);
      }
Note yield is a reserved word in Rust, so we can’t name our function that. If that was not the case, it would be my preferred name for it over the slightly more cryptic t_yield.
This is the return function that we call when a thread is finished. return is another reserved keyword
in Rust, so we name this t_return(). Make a note that the user of our threads does not call this;
we set up our stack so this is called when the task is done:
      fn t_return(&mut self) {
          if self.current != 0 {
              self.threads[self.current].state = State::Available;
              self.t_yield();
          }
      }
If the calling thread is the base_thread, we won’t do anything. Our runtime will call t_yield for us on the base thread. If it’s called from a spawned thread, we know it’s finished since all threads will have a guard function on top of their stack (which we’ll show further down), and the only place where this function is called is on our guard function. We set its state to Available, letting the runtime know it’s ready to be assigned a new task, and then immediately call t_yield, which will schedule a new thread to be run. So, finally, we get to the heart of our runtime: the t_yield function. The first part of this function is our scheduler. We simply go through all the threads and see if any are in the Ready state, which indicates that it has a task it is ready to make progress. This could be a database call that has returned in a real-world application. If no thread is Ready, we’re all done. This is an extremely simple scheduler using only a round-robin algorithm. A real scheduler might have a much more sophisticated way of deciding what task to run next. If we find a thread that’s ready to be run, we change the state of the current thread from Running to Ready.
118 Creating Our Own Fibers
      Let’s present the function before we go on to explain the last part of it:
            #[inline(never)]
            fn t_yield(&mut self) -> bool {
                let mut pos = self.current;
                while self.threads[pos].state != State::Ready {
                    pos += 1;
                    if pos == self.threads.len() {
                        pos = 0;
                    }
                    if pos == self.current {
                        return false;
                    }
                }
                if self.threads[self.current].state != State::Available {
                    self.threads[self.current].state = State::Ready;
                }
                self.threads[pos].state = State::Running;
                let old_pos = self.current;
                self.current = pos;
                unsafe {
                    let old: *mut ThreadContext = &mut self.threads[old_pos].ctx;
                    let new: *const ThreadContext = &self.threads[pos].ctx;
                    asm!("call switch", in("rdi") old, in("rsi") new, clobber_abi("C"));
                }
                self.threads.len() > 0
            }
      The next thing we do is to call the function switch, which will save the current context (the old
      context) and load the new context into the CPU. The new context is either a new task or all the
      information the CPU needs to resume work on an existing task.
      Our switch function, which we will cover a little further down, takes two arguments and is marked
      as #[naked]. Naked functions are not like normal functions. They don’t accept formal arguments,
      for example, so we can’t simply call it in Rust as a normal function like switch(old, new).
      You see, usually, when we call a function with two arguments, the compiler will place each argument
      in a register described by the calling convention for the platform. However, when we call a #[naked]
      function, we need to take care of this ourselves. Therefore, we pass in the address to our old and new
      ThreadContext using assembly. rdi is the register for the first argument in the System V ABI
      calling convention and rsi is the register used for the second argument.
      The #[inline(never)] attribute prevents the compiler from simply substituting a call to our
      function with a copy of the function content wherever it’s called (this is what inlining means). This is
Implementing our own fibers 119
almost never a problem on debug builds, but in this case, our program will fail if the compiler inlines this function in a release build. The issue manifests itself by the runtime exiting before all the tasks are finished. Since we store Runtime as a static usize that we then cast as a *mut pointer (which is almost guaranteed to cause UB), it’s most likely caused by the compiler making the wrong assumptions when this function is inlined and called by casting and dereferencing RUNTIME in one of the helper methods that will be outlined. Just make a note that this is probably avoidable if we change our design; it’s not something worth dwelling on for too long in this specific case.
More inline assembly We need to explain the new concepts we introduced here. The assembly calls the function switch (the function is tagged with #[no_mangle] so we can call it by name). The in("rdi") old and in("rsi") new arguments place the value of old and new to the rdi and rsi registers, respectively. The System V ABI for x86-64 states that the rdi register holds the first argument to a function and rsi holds the second argument. The clobber_abi("C") argument tells the compiler that it may not assume any that any general-purpose registers are preserved across the asm! block. The compiler will emit instructions to push the registers it uses to the stack and restore them when resuming after the asm! block. If you take one more look at the list in Figure 5.1, we already know that we need to take special care with registers that are marked as callee saved. When calling a normal function, the compiler will insert code* to save/restore all the non-callee-saved, or caller saved, registers before calling a function so it can resume with the correct state when the function returns. Since we marked the function we’re calling as #[naked], we explicitly told the compiler to not insert this code, so the safest thing is to make sure the compiler doesn’t assume that it can rely on any register being untouched when it resumes after the call we make in our asm! block. *In some instances, the compiler will know that a register is untouched by the function call since it controls the register usage in both the caller and the callee and it will not emit any special instructions to save/restore registers they know will be untouched when the function returns
The self.threads.len() > 0 line at the end is just a way for us to prevent the compiler from
optimizing our code away. This happens to me on Windows but not on Linux, and it is a common
problem when running benchmarks, for example. There are other ways of preventing the compiler
from optimizing this code, but I chose the simplest way I could find. As long as it’s commented, it
should be OK to do. The code never reaches this point anyway.
Next up is our spawn function. I’ll present the function first and guide you through it after:
  pub fn spawn(&mut self, f: fn()) {
      let available = self
          .threads
          .iter_mut()
          .find(|t| t.state == State::Available)
          .expect("no available thread.");
120 Creating Our Own Fibers
            let size = available.stack.len();
            unsafe {
                let s_ptr = available.stack.as_mut_ptr().offset(size as isize);
                let s_ptr = (s_ptr as usize & !15) as *mut u8;
                std::ptr::write(s_ptr.offset(-16) as *mut u64, guard as u64);
                std::ptr::write(s_ptr.offset(-24) as *mut u64, skip as u64);
                std::ptr::write(s_ptr.offset(-32) as *mut u64, f as u64);
                available.ctx.rsp = s_ptr.offset(-32) as u64;
            }
            available.state = State::Ready;
        }
        } // We close the `impl Runtime` block here
         Note
         I promised to point out where we close the impl Runtime block, and we do that after the
         spawn function. The upcoming functions are “free” functions that don’t belong to a struct.
      While I think t_yield is the logically interesting function in this example, I think spawn is the
      most interesting one technically.
      The first thing to note is that the function takes one argument: f: fn(). This is simply a function
      pointer to the function we take as an argument. This function is the task we want to run concurrently
      with other tasks. If this was a library, this is the function that users actually pass to us and want our
      runtime to handle concurrently.
      In this example, we take a simple function as an argument, but if we modify the code slightly we can
      also accept a closure.
         Tip
         In example ch05/d-fibers-closure, you can see a slightly modified example that accepts
         a closure instead, making it more flexible than the one we walk through here. I would really
         encourage you to check that one out once you’ve finished this example.
      The rest of the function is where we set up our stack as we discussed in the previous chapter and make
      sure our stack looks like the one specified in the System V ABI stack layout.
Implementing our own fibers 121
When we spawn a new fiber (or userland thread), we first check if there are any available userland threads (threads in Available state). If we run out of threads, we panic in this scenario, but there are several (better) ways to handle that. We’ll keep things simple for now. When we find an available thread, we get the stack length and a pointer to our u8 byte array. In the next segment, we have to use some unsafe functions. We’ll explain the functions we refer to here later, but this is where we set them up in our new stack so that they’re called in the right order for our runtime to work. First, we make sure that the memory segment we’ll use is 16-byte-aligned. Then, we write the address to our guard function that will be called when the task we provide finishes and the function returns. Second, we’ll write the address to a skip function, which is there just to handle the gap when we return from f, so that guard will get called on a 16-byte boundary. The next value we write to the stack is the address to f.
Why do we need the skip function? Remember how we explained how the stack works? We want the f function to be the first to run, so we set the base pointer to f and make sure it’s 16-byte aligned. We then push the address to the skip function and lastly the guard function. Since, skip is simply one instruction, ret, doing this makes sure that our call to guard is 16-byte aligned so that we adhere to the ABI requirements.
After we’ve written our function pointers to the stack, we set the value of rsp, which is the stack pointer to the address of our provided function, so we start executing that first when we are scheduled to run. Lastly, we set the state to Ready, which means we have work to do and that we are ready to do it. Remember, it’s up to our scheduler to actually start up this thread. We’re now finished implementing our Runtime, if you got all this, you basically understand how fibers/green threads work. However, there are still a few details needed to make it all work.
Guard, skip, and switch functions
There are a few functions we’ve referred to that are really important for our Runtime to actually work.
Fortunately, all but one of them are extremely simple to understand. We’ll start with the guard function:
  fn guard() {
      unsafe {
          let rt_ptr = RUNTIME as *mut Runtime;
          (*rt_ptr).t_return();
      };
  }
122 Creating Our Own Fibers
      The guard function is called when the function that we passed in, f, has returned. When f returns,
      it means our task is finished, so we de-reference our Runtime and call t_return(). We could
      have made a function that does some additional work when a thread is finished, but right now, our
      t_return() function does all we need. It marks our thread as Available (if it’s not our base
      thread) and yields so we can resume work on a different thread.
      Next is our skip function:
        #[naked]
        unsafe extern "C" fn skip() {
            asm!("ret", options(noreturn))
        }
      There is not much happening in the skip function. We use the #[naked] attribute so that this
      function essentially compiles down to just ret instruction. ret will just pop off the next value from the
      stack and jump to whatever instructions that address points to. In our case, this is the guard function.
      Next up is a small helper function named yield_thread:
        pub fn yield_thread() {
            unsafe {
                let rt_ptr = RUNTIME as *mut Runtime;
                (*rt_ptr).t_yield();
            };
        }
      This helper function lets us call t_yield on our Runtime from an arbitrary place in our code
      without needing any references to it. This function is very unsafe, and it’s one of the places where we
      make big shortcuts to make our example slightly simpler to understand. If we call this and our Runtime
      is not initialized yet or the runtime is dropped, it will result in undefined behavior. However, making
      this safer is not a priority for us just to get our example up and running.
      We are very close to the finish line; just one more function to go. The last bit we need is our switch
      function, and you already know the most important parts of it already. Let’s see how it looks and
      explain how it differs from our first stack swap function:
        #[naked]
        #[no_mangle]
        unsafe extern "C" fn switch() {
            asm!(
                "mov [rdi + 0x00], rsp",
                "mov [rdi + 0x08], r15",
                "mov [rdi + 0x10], r14",
                "mov [rdi + 0x18], r13",
                "mov [rdi + 0x20], r12",
                "mov [rdi + 0x28], rbx",
                "mov [rdi + 0x30], rbp",
Implementing our own fibers 123
          "mov rsp, [rsi + 0x00]",
          "mov r15, [rsi + 0x08]",
          "mov r14, [rsi + 0x10]",
          "mov r13, [rsi + 0x18]",
          "mov r12, [rsi + 0x20]",
          "mov rbx, [rsi + 0x28]",
          "mov rbp, [rsi + 0x30]",
          "ret", options(noreturn)
      );
  }
So, this is our full stack switch function. You probably remember from our first example that this is just a bit more elaborate. We first read out the values of all the registers we need and then set all the register values to the register values we saved when we suspended execution on the new thread. This is essentially all we need to do to save and resume the execution. Here we see the #[naked] attribute used again. Usually, every function has a prologue and an epilogue and we don’t want that here since this is all assembly and we want to handle everything ourselves. If we don’t include this, we will fail to switch back to our stack the second time. You can also see us using the offset we introduced earlier in practice: 0x00[rdi] # 0 0x08[rdi] # 8 0x10[rdi] # 16 0x18[rdi] # 24
These are hex numbers indicating the offset from the memory pointer to which we want to read/write. I wrote down the base 10 numbers as comments, so as you can see, we only offset the pointer in 8-byte steps, which is the same size as the u64 fields on our ThreadContext struct. This is also why it’s important to annotate ThreadContext with #[repr(C)]; it tells us that the data will be represented in memory in this exact way so we write to the right field. The Rust ABI makes no guarantee that they are represented in the same order in memory; however, the C-ABI does. Finally, there is one new option added to the asm! block. option(noreturn) is a requirement when writing naked functions and we will receive a compile error if we don’t add it. Usually, the compiler will assume that a function call will return, but naked functions are not anything like the functions we’re used to. They’re more like labeled containers of assembly that we can call, so we don’t want the compiler to emit ret instructions at the end of the function or make any assumptions that we return to the previous stack frame. By using this option, we tell the compiler to treat the assembly block as if it never returns, and we make sure that we never fall through the assembly block by adding a ret instruction ourselves. Next up is our main function, which is pretty straightforward, so I’ll simply present the code here:
124 Creating Our Own Fibers
        fn main() {
            let mut runtime = Runtime::new();
            runtime.init();
            runtime.spawn(|| {
                println!("THREAD 1 STARTING");
                let id = 1;
                for i in 0..10 {
                    println!("thread: {} counter: {}", id, i);
                    yield_thread();
                }
                println!("THREAD 1 FINISHED");
            });
            runtime.spawn(|| {
                println!("THREAD 2 STARTING");
                let id = 2;
                for i in 0..15 {
                    println!("thread: {} counter: {}", id, i);
                    yield_thread();
                }
                println!("THREAD 2 FINISHED");
            });
            runtime.run();
        }
      As you see here, we initialize our runtime and spawn two threads: one that counts to 10 and yields
      between each count and one that counts to 15. When we cargo run our project, we should get
      the following output:
        Finished dev [unoptimized + debuginfo] target(s) in 2.17s
        Running `target/debug/green_threads`
        THREAD 1 STARTING
        thread: 1 counter: 0
        THREAD 2 STARTING
        thread: 2 counter: 0
        thread: 1 counter: 1
        thread: 2 counter: 1
        thread: 1 counter: 2
        thread: 2 counter: 2
        thread: 1 counter: 3
        thread: 2 counter: 3
        thread: 1 counter: 4
        thread: 2 counter: 4
        thread: 1 counter: 5
        thread: 2 counter: 5
        thread: 1 counter: 6
        thread: 2 counter: 6
        thread: 1 counter: 7
Finishing thoughts 125
thread: 2 counter: 7 thread: 1 counter: 8 thread: 2 counter: 8 thread: 1 counter: 9 thread: 2 counter: 9 THREAD 1 FINISHED. thread: 2 counter: 10 thread: 2 counter: 11 thread: 2 counter: 12 thread: 2 counter: 13 thread: 2 counter: 14 THREAD 2 FINISHED.
Beautiful! Our threads alternate since they yield control on each count until THREAD 1 finishes and THREAD 2 counts the last numbers before it finishes its task.
Finishing thoughts I want to round off this chapter by pointing out some of the advantages and disadvantages of this approach, which we went through in Chapter 2, since we now have first-hand experience with this topic. First of all, the example we implemented here is an example of what we called a stackful coroutine. Each coroutine (or thread, as we call it in the example implementation) has its own stack. This also means that we can interrupt and resume execution at any point in time. It doesn’t matter if we’re in the middle of a stack frame (in the middle of executing a function); we can simply tell the CPU to save the state we need to the stack, return to a different stack and restore the state it needs there, and resume as if nothing has happened. You can also see that we have to manage our stacks in some way. In our example, we just create a static stack (much like the OS does when we ask it for a thread, but smaller), but for this to be more efficient than using OS threads, we need to select a strategy to solve that potential problem. If you look at our slightly expanded example in ch05/d-fibers-closure, you’ll notice that we can make the API pretty easy to use, much like the API used for std::thread::spawn in the standard library. The flipside is of course the complexity of implementing this correctly on all combinations of ISA/ABIs that we want to support, and while specific to Rust, it’s challenging to create a great and safe API over these kinds of stackful coroutines without any native language support for it. To tie this into Chapter 3, where we discuss event queues and non-blocking calls, I want to point out that if you use fibers to handle concurrency, you would call yield after you’ve made a read interest in your non-blocking call. Typically, a runtime would supply these non-blocking calls, and the fact that we yield would be opaque to the user, but the fiber is suspended at that point. We would probably add one more state to our State enum called Pending or something else that signifies that the thread is waiting for some external event.
126 Creating Our Own Fibers
      When the OS signals that the data is ready, we would mark the thread as State::Ready to resume
      and the scheduler would resume execution just like in this example.
      While it requires a more sophisticated scheduler and infrastructure, I hope that you have gotten a
      good idea of how such a system would work in practice.
      Summary
      First of all, congratulations! You have now implemented a super simple but working example of fibers.
      You’ve set up your own stack and learned about ISAs, ABIs, calling conventions, and inline assembly
      in Rust.
      It was quite the ride we had to take, but if you came this far and read through everything, you should
      give yourself a big pat on the back. This is not for the faint of heart, but you pulled through.
      This example (and chapter) might take a little time to fully digest, but there is no rush for that. You can
      always go back to this example and read the code again to fully understand it. I really do recommend
      that you play around with the code yourself and get to know it. Change the scheduling algorithm
      around, add more context to the threads you create, and use your imagination.
      You will probably experience that debugging problems in low-level code like this can be pretty hard,
      but that’s part of the learning process and you can always revert back to a working version.
      Now that we have covered one of the largest and most difficult examples in this book, we’ll go on to
      learn about another popular way of handling concurrency by looking into how futures and async/await
      works in Rust. The rest of this book is in fact dedicated solely to learning about futures and async/
      await in Rust, and since we've gained so much fundamental knowledge at this point, it will be much
      easier for us to get a good and deep understanding of how they work. You've done a great job so far!
                                                    Part 3:
                                               Futures and
                                        async/await in Rust
This part will explain Futures and async/await in Rust from the ground up. Building upon the knowledge acquired thus far, we will construct a central example that will serve as a recurring theme in the subsequent chapters, eventually leading to the creation of a runtime capable of executing futures in Rust. Throughout this exploration, we will delve into concepts such as coroutines, runtimes, reactors, executors, wakers, and much more. This part comprises the following chapters:
    • Chapter 6, Futures in Rust
    • Chapter 7, Coroutines and async/await
    • Chapter 8, Runtimes, Wakers, and the Reactor-Executor Pattern
    • Chapter 9, Coroutines, Self-referential Structs, and Pinning
    • Chapter 10, Create Your Own Runtime