Ch 4 — Create Your Own Event Queue
Create Your Own Event Queue In this chapter, we’ll create a simple version of an event queue using epoll. We’ll take inspiration from mio (https://github.com/tokio-rs/mio), a low-level I/O library written in Rust that underpins much of the Rust async ecosystem. Taking inspiration from mio has the added benefit of making it easier to dive into their code base if you wish to explore how a real production-ready library works. By the end of this chapter, you should be able to understand the following:
• The difference between blocking and non-blocking I/O • How to use epoll to make your own event queue • The source code of cross-platform event queue libraries such as mio • Why we need an abstraction layer on top of epoll, kqueue, and IOCP if we want a program or library to work across different platforms
We’ve divided the chapter into the following sections:
• Design and introduction to epoll • The ffi module • The Poll module • The main program
Technical requirements This chapter focuses on epoll, which is specific to Linux. Unfortunately, epoll is not part of the Portable Operating System Interface (POSIX) standard, so this example will require you to run Linux and won’t work with macOS, BSD, or Windows operating systems. If you’re on a machine running Linux, you’re already set and can run the examples without any further steps.
66 Create Your Own Event Queue
     If you’re on Windows, my recommendation is to set up WSL (https://learn.microsoft.
     com/en-us/windows/wsl/install), if you haven’t already, and install Rust on the Linux
     operating system running on WSL.
     If you’re using Mac, you can create a virtual machine (VM) running Linux, for example, by using
     the QEMU-based UTM application (https://mac.getutm.app/) or any other solution for
     managing VMs on a Mac.
     A last option is to rent a Linux server (there are even some providers with a free layer), install Rust,
     and either use an editor such as Vim or Emacs in the console or develop on the remote machine
     using VS Code through SSH (https://code.visualstudio.com/docs/remote/ssh).
     I personally have good experience with Linode’s offering (https://www.linode.com/), but
     there are many, many other options out there.
     It’s theoretically possible to run the examples on the Rust playground, but since we need a delay server,
     we would have to use a remote delay server service that accepts plain HTTP requests (not HTTPS)
     and modify the code so that the modules are all in one file instead. It’s possible in a clinch but not
     really recommended.
        The delay server
        This example relies on calls made to a server that delays the response for a configurable duration.
        In the repository, there is a project named delayserver in the root folder.
        You can set up the server by simply entering the folder in a separate console window and
        writing cargo run. Just leave the server running in a separate, open terminal window as
        we’ll use it in our example.
        The delayserver program is cross-platform, so it works without any modification on all
        platforms that Rust supports. If you’re running WSL on Windows, I recommend running the
        delayserver program in WSL as well. Depending on your setup, you might get away with
        running the server in a Windows console and still be able to reach it when running the example
        in WSL. Just be aware that it might not work out of the box.
        The server will listen to port 8080 by default and the examples there assume this is the port
        used. You can change the listening port in the delayserver code before you start the server,
        but just remember to make the same corrections in the example code.
        The actual code for delayserver is less than 30 lines, so going through the code should
        only take a few minutes if you want to see what the server does.
     Design and introduction to epoll
     Okay, so this chapter will be centered around one main example you can find in the repository under
     ch04/a-epoll. We’ll start by taking a look at how we design our example.
Design and introduction to epoll 67
As I mentioned at the start of this chapter, we’ll take our inspiration from mio. This has one big upside and one downside. The upside is that we get a gentle introduction to how mio is designed, making it much easier to dive into that code base if you want to learn more than what we cover in this example. The downside is that we introduce an overly thick abstraction layer over epoll, including some design decisions that are very specific to mio. I think the upsides outweigh the downsides for the simple reason that if you ever want to implement a production-quality event loop, you’ll probably want to look into the implementations that are already out there, and the same goes for if you want to dig deeper into the building blocks of asynchronous programming in Rust. In Rust, mio is one of the important libraries underpinning much of the async ecosystem, so gaining a little familiarity with it is an added bonus. It’s important to note that mio is a cross-platform library that creates an abstraction over epoll, kqueue, and IOCP (through Wepoll, as we described in Chapter 3). Not only that, mio supports iOS and Android, and in the future, it will likely support other platforms as well. So, leaving the door open to unify an API over so many different systems is bound to also come with some compromises if you compare it to what you can achieve if you only plan to support one platform.
mio mio describes itself as a “fast, low-level I/O library for Rust focusing on non-blocking APIs and event notification for building performance I/O apps with as little overhead as possible over the OS abstractions.” mio drives the event queue in Tokio, which is one of the most popular and widely used asynchronous runtimes in Rust. This means that mio is driving I/O for popular frameworks such as Actix Web (https://actix.rs/), Warp (https://github.com/seanmonstar/ warp), and Rocket (https://rocket.rs/). The version of mio we’ll use as design inspiration in this example is version 0.8.8. The API has changed in the past and may change in the future, but the parts of the API we cover here have been stable since 2019, so it’s a good bet that there will not be significant changes to it in the near future.
As is the case with all cross-platform abstractions, it’s often necessary to go the route of choosing the least common denominator. Some choices will limit flexibility and efficiency on one or more platforms in the pursuit of having a unified API that works with all of them. We’ll discuss some of those choices in this chapter. Before we go further, let’s create a blank project and give it a name. We’ll refer to it as a-epoll going forward, but you will of course need to replace that with the name you choose. Enter the folder and type the cargo init command.
68 Create Your Own Event Queue
     In this example, we’ll divide the project into a few modules, and we’ll split the code up into the
     following files:
       src
        |-- ffi.rs
        |-- main.rs
        |-- poll.rs
Their descriptions are as follows:
        • ffi.rs: This module will contain the code related to the syscalls we need to communicate
          with the host operating system
        • main.rs: This is the example program itself
        • poll.rs: This module contains the main abstraction, which is a thin layer over epoll
     Next, create the four files, mentioned in the preceding list, in the src folder.
     In main.rs, we need to declare the modules as well:
     a-epoll/src/main.rs
       mod ffi;
       mod poll;
     Now that we have our project set up, we can start by going through how we’ll design the API we’ll
     use. The main abstraction is in poll.rs, so go ahead and open that file.
     Let’s start by stubbing out the structures and functions we need. It’s easier to discuss them when we
     have them in front of us:
     a-epoll/src/poll.rs
       use std::{io::{self, Result}, net::TcpStream, os::fd::AsRawFd};
       use crate::ffi;
type Events = Vec<ffi::Event>;
       pub struct Poll {
         registry: Registry,
       }
       impl Poll {
         pub fn new() -> Result<Self> {
           todo!()
Design and introduction to epoll 69
}
    pub fn registry(&self) -> &Registry {
      &self.registry
    }
    pub fn poll(&mut self, events: &mut Events, timeout: Option<i32>) -> Result<()> {
      todo!()
    }
  }
pub struct Registry { raw_fd: i32, }
  impl Registry {
    pub fn register(&self, source: &TcpStream, token: usize, interests: i32) -> Result<()>
  {
      todo!()
    }
  }
  impl Drop for Registry {
    fn drop(&mut self) {
      todo!()
    }
  }
We’ve replaced all the implementations with todo!() for now. This macro will let us compile the program even though we’ve yet to implement the function body. If our execution ever reaches todo!(), it will panic. The first thing you’ll notice is that we’ll pull the ffi module in scope in addition to some types from the standard library. We’ll also use the std::io::Result type as our own Result type. It’s convenient since most errors will stem from one of our calls into the operating system, and an operating system error can be mapped to an io::Error type. There are two main abstractions over epoll. One is a structure called Poll and the other is called Registry. The name and functionality of these functions are the same as they are in mio. Naming abstractions such as these is surprisingly difficult, and both constructs could very well have had a different name, but let’s lean on the fact that someone else has spent time on this before us and decided to go with these in our example.
70 Create Your Own Event Queue
Poll is a struct that represents the event queue itself. It has a few methods:
        • new: Creates a new event queue
        • registry: Returns a reference to the registry that we can use to register interest to be notified
          about new events
        • poll: Blocks the thread it’s called on until an event is ready or it times out, whichever occurs first
     Registry is the other half of the equation. While Poll represents the event queue, Registry is
     a handle that allows us to register interest in new events.
     Registry will only have one method: register. Again, we mimic the API mio uses (https://
     docs.rs/mio/0.8.8/mio/struct.Registry.html), and instead of accepting a predefined
     list of methods for registering different interests, we accept an interests argument, which will
     indicate what kind of events we want our event queue to keep track of.
     One more thing to note is that we won’t use a generic type for all sources. We’ll only implement this
     for TcpStream, even though there are many things we could potentially track with an event queue.
     This is especially true when we want to make this cross-platform since, depending on the platforms
     you want to support, there are many types of event sources we might want to track.
     mio solves this by having Registry::register accept an object implementing the Source
     trait that mio defines. As long as you implement this trait for the source, you can use the event queue
     to track events on it.
     In the following pseudo-code, you’ll get an idea of how we plan to use this API:
       let queue = Poll::new().unwrap();
       let id = 1;
       // register interest in events on a TcpStream
       queue.registry().register(&stream, id, ...).unwrap();
       let mut events = Vec::with_capacity(1);
       // This will block the curren thread
       queue.poll(&mut events, None).unwrap();
       //...data is ready on one of the tracked streams
     You might wonder why we need the Registry struct at all.
     To answer that question, we need to remember that mio abstracts over epoll, kqueue, and IOCP.
     It does this by making Registry wrap around a Selector object. The Selector object is
     conditionally compiled so that every platform has its own Selector implementation corresponding
     to the relevant syscalls to make IOCP, kqueue, and epoll do the same thing.
Design and introduction to epoll 71
Registry implements one important method we won’t implement in our example, called try_clone. The reason we won’t implement this is that we don’t need it to understand how an event loop like this works and we want to keep the example simple and easy to understand. However, this method is important for understanding why the responsibility of registering events and the queue itself is divided.
Important note By moving the concern of registering interests to a separate struct like this, users can call Registry::try_clone to get an owned Registry instance. This instance can be passed to, or shared through Arc<Registry> with, other threads, allowing multiple threads to register interest to the same Poll instance even when Poll is blocking another thread while waiting for new events to happen in Poll::poll.
Poll::poll requires exclusive access since it takes a &mut self, so when we’re waiting for events in Poll::poll, there is no way to register interest from a different thread at the same time if we rely on using Poll to register interest, since that will be prevented by Rust’s type system. It also makes it effectively impossible to have multiple threads waiting for events by calling Poll::poll on the same instance in any meaningful way since it would require synchronization that essentially would make each call sequential anyway. The design lets users interact with the queue from potentially many threads by registering interest, while one thread makes the blocking call and handles the notifications from the operating system.
Note The fact that mio doesn’t enable you to have multiple threads that are blocked on the same call to Poll::poll isn’t a limitation due to epoll, kqueue, or IOCP. They all allow for the scenario that many threads will call Poll::poll on the same instance and get notifications on events in the queue. epoll even allows specific flags to dictate whether the operating system should wake up only one or all threads that wait for notification (specifically the EPOLLEXCLUSIVE flag).
The problem is partly about how the different platforms decide which threads to wake when there are many of them waiting for events on the same queue, and partly about the fact that there doesn’t seem to be a huge interest in that functionality. For example, epoll will, by default, wake all threads that block on Poll, while Windows, by default, will only wake up one thread. You can modify this behavior to some extent, and there have been ideas on implementing a try_clone method on Poll as well in the future. For now, the design is like we outlined, and we will stick to that in our example as well.
This brings us to another topic we should cover before we start implementing our example.
72 Create Your Own Event Queue
     Is all I/O blocking?
     Finally, a question that’s easy to answer. The answer is a big, resounding… maybe. The thing is that
     not all I/O operations will block in the sense that the operating system will park the calling thread and
     it will be more efficient to switch to another task. The reason for this is that the operating system is
     smart and will cache a lot of information in memory. If information is in the cache, a syscall requesting
     that information would simply return immediately with the data, so forcing a context switch or any
     rescheduling of the current task might be less efficient than just handling the data synchronously.
     The problem is that there is no way to know for sure whether I/O is blocking and it depends on what
     you’re doing.
     Let me give you two examples.
DNS lookup
     When creating a TCP connection, one of the first things that happens is that you need to convert
     a typical address such as www.google.com to an IP address such as 216.58.207.228. The
     operating system maintains a mapping of local addresses and addresses it’s previously looked up in
     a cache and will be able to resolve them almost immediately. However, the first time you look up an
     unknown address, it might have to make a call to a DNS server, which takes a lot of time, and the OS
     will park the calling thread while waiting for the response if it’s not handled in a non-blocking manner.
File I/O
     Files on the local filesystem are another area where the operating system performs quite a bit of
     caching. Smaller files that are frequently read are often cached in memory, so requesting that file
     might not block at all. If you have a web server that serves static files, there is most likely a rather
     limited set of small files you’ll be serving. The chances are that these are cached in memory. However,
     there is no way to know for sure – if an operating system is running low on memory, it might have
     to map memory pages to the hard drive, which makes what would normally be a very fast memory
     lookup excruciatingly slow. The same is true if there is a huge number of small files that are accessed
     randomly, or if you serve very large files since the operating system will only cache a limited amount of
     information. You’ll also encounter this kind of unpredictability if you have many unrelated processes
     running on the same operating system as it might not cache the information that’s important to you.
     A popular way of handling these cases is to forget about non-blocking I/O, and actually make a
     blocking call instead. You don’t want to do these calls in the same thread that runs a Poll instance
     (since every small delay will block all tasks), but you would probably relegate that task to a thread
     pool. In the thread pool, you have a limited number of threads that are tasked with making regular
     blocking calls for things such as DNS lookups or file I/O.
     An example of a runtime that does exactly this is libuv (http://docs.libuv.org/en/
     v1.x/threadpool.html#threadpool). libuv is the asynchronous I/O library that Node.
     js is built upon.
The ffi module 73
While its scope is larger than mio (which only cares about non-blocking I/O), libuv is to Node in JavaScript what mio is to Tokio in Rust.
Note The reason for doing file I/O in a thread pool is that there have historically been poor crossplatform APIs for non-blocking file I/O. While it’s true that many runtimes choose to relegate this task to a thread pool making blocking calls to the OS, it might not be true in the future as the OS APIs evolve over time.
Creating a thread pool to handle these cases is outside the scope of this example (even mio considers this outside its scope, just to be clear). We’ll focus on showing how epoll works and mention these topics in the text, even though we won’t actually implement a solution for them in this example. Now that we’ve covered a lot of basic information about epoll, mio, and the design of our example, it’s time to write some code and see for ourselves how this all works in practice.
The ffi module Let’s start with the modules that don’t depend on any others and work our way from there. The ffi module contains mappings to the syscalls and data structures we need to communicate with the operating system. We’ll also explain how epoll works in detail once we have presented the syscalls. It’s only a few lines of code, so I’ll place the first part here so it’s easier to keep track of where we are in the file since there’s quite a bit to explain. Open the ffi.rs file and write the following lines of code:
ch04/a-epoll/src/ffi.rs pub const EPOLL_CTL_ADD: i32 = 1; pub const EPOLLIN: i32 = 0x1; pub const EPOLLET: i32 = 1 << 31;
  #[link(name = "c")]
  extern "C" {
    pub fn epoll_create(size: i32) -> i32;
    pub fn close(fd: i32) -> i32;
    pub fn epoll_ctl(epfd: i32, op: i32, fd: i32, event: *mut Event) -> i32;
    pub fn epoll_wait(epfd: i32, events: *mut Event, maxevents: i32, timeout: i32) -> i32;
  }
The first thing you’ll notice is that we declare a few constants called EPOLL_CTL_ADD, EPOLLIN, and EPOLLET.
74 Create Your Own Event Queue
     I’ll get back to explaining what these constants are in a moment. Let’s first take a look at the syscalls
     we need to make. Fortunately, we’ve already covered syscalls in detail, so you already know the basics
     of ffi and why we link to C in the preceding code:
        • epoll_create is the syscall we make to create an epoll queue. You can find the documentation
          for it at https://man7.org/linux/man-pages/man2/epoll_create.2.html.
          This method accepts one argument called size, but size is there only for historical reasons.
          The argument will be ignored but must have a value larger than 0.
        • close is the syscall we need to close the file descriptor we get when we create our epoll
          instance, so we release our resources properly. You can read the documentation for the syscall
          at https://man7.org/linux/man-pages/man2/close.2.html.
        • epoll_ctl is the control interface we use to perform operations on our epoll instance. This
          is the call we use to register interest in events on a source. It supports three main operations:
          add, modify, or delete. The first argument, epfd, is the epoll file descriptor we want to perform
          operations on. The second argument, op, is the argument where we specify whether we want
          to perform an add, modify, or delete operation
        • In our case, we’re only interested in adding interest for events, so we’ll only pass in EPOLL_
          CTL_ADD, which is the value to indicate that we want to perform an add operation. epoll_
          event is a little more complicated, so we’ll discuss it in more detail. It does two important
          things for us: first, the events field indicates what kind of events we want to be notified of
          and it can also modify the behavior of how and when we get notified. Second, the data field
          passes on a piece of data to the kernel that it will return to us when an event occurs. The latter
          is important since we need this data to identify exactly what event occurred since that’s the
          only information we’ll receive in return that can identify what source we got the notification
          for. You can find the documentation for this syscall here: https://man7.org/linux/
          man-pages/man2/epoll_ctl.2.html.
        • epoll_wait is the call that will block the current thread and wait until one of two things
          happens: we receive a notification that an event has occurred or it times out. epfd is the epoll
          file descriptor identifying the queue we made with epoll_create. events is an array of
          the same Event structure we used in epoll_ctl. The difference is that the events field
          now gives us information about what event did occur, and importantly the data field contains
          the same data that we passed in when we registered interest
        • For example, the data field lets us identify which file descriptor has data that’s ready to be
          read. The maxevents arguments tell the kernel how many events we have reserved space
          for in our array. Lastly, the timeout argument tells the kernel how long we will wait for
          events before it will wake us up again so we don’t potentially block forever. You can read the
          documentation for epoll_wait at https://man7.org/linux/man-pages/man2/
          epoll_wait.2.html.
The ffi module 75
The last part of the code in this file is the Event struct:
ch04/a-epoll/src/ffi.rs
  #[derive(Debug)]
  #[repr(C, packed)]
  pub struct Event {
      pub(crate) events: u32,
      // Token to identify event
      pub(crate) epoll_data: usize,
  }
  impl Event {
      pub fn token(&self) -> usize {
          self.epoll_data
      }
  }
This structure is used to communicate to the operating system in epoll_ctl, and the operating system uses the same structure to communicate with us in epoll_wait. Events are defined as a u32, but it’s more than just a number. This field is what we call a bitmask. I’ll take the time to explain bitmasks in a later section since it’s common in most syscalls and not something everyone has encountered before. In simple terms, it’s a way to use the bit representation as a set of yes/no flags to indicate whether an option has been chosen or not. The different options are described in the link I provided for the epoll_ctl syscall. I won’t explain all of them in detail here, but just cover the ones we’ll use:
• EPOLLIN represents a bitflag indicating we’re interested in read operations on the file handle • EPOLLET represents a bitflag indicating that we’re interested in getting events notified with epoll set to an edge-triggered mode
We’ll get back to explaining bitflags, bitmasks, and what edge-triggered mode really means in a moment, but let’s just finish with the code first. The last field on the Event struct is epoll_data. This field is defined as a union in the documentation. A union is much like an enum, but in contrast to Rust’s enums, it doesn’t carry any information on what type it is, so it’s up to us to make sure we know what type of data it holds. We use this field to simply hold a usize so we can pass in an integer identifying each event when we register interest using epoll_ctl. It would be perfectly fine to pass in a pointer instead – just as long as we make sure that the pointer is still valid when it’s returned to us in epoll_wait. We can think of this field as a token, which is exactly what mio does, and to keep the API as similar as possible, we copy mio and provide a token method on the struct to get this value.
76 Create Your Own Event Queue
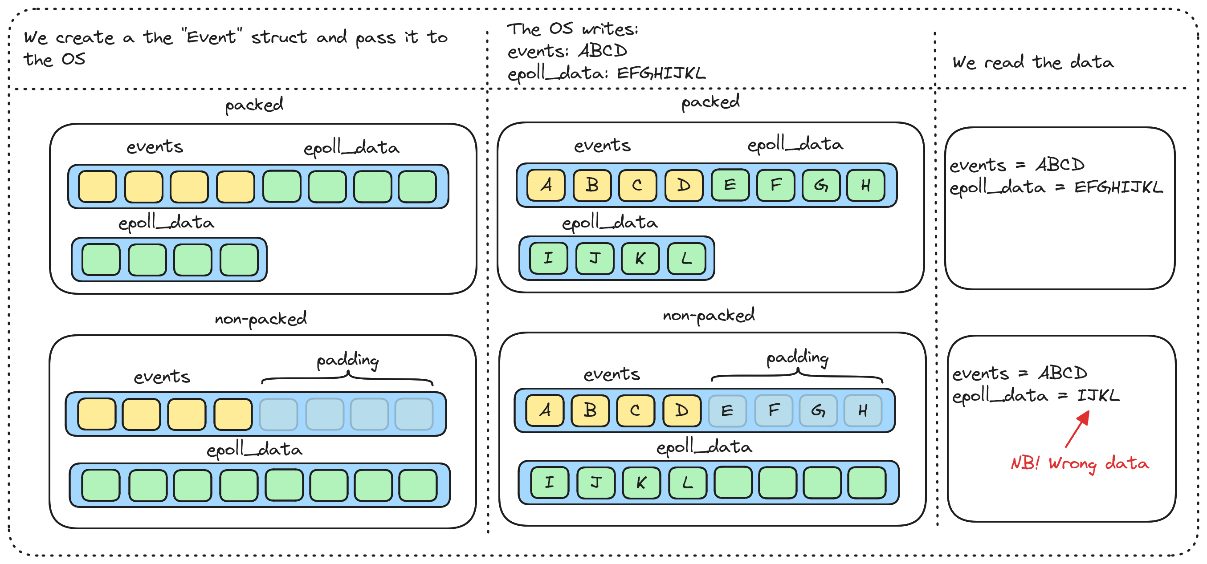
        What does #[repr(packed)] do?
        The #[repr(packed)] annotation is new to us. Usually, a struct will have padding either
        between fields or at the end of the struct. This happens even when we’ve specified #[repr(C)].
        The reason has to do with efficient access to the data stored in the struct by not having to make
        multiple fetches to get the data stored in a struct field. In the case of the Event struct, the
        usual padding would be adding 4 bytes of padding at the end of the events field. When the
        operating system expects a packed struct for Event, and we give it a padded one, it will write
        parts of event_data to the padding between the fields. When you try to read event_data
        later on, you’ll end up only reading the last part of event_data, which happened to overlap
        and get the wrong data
        The fact that the operating systemexpects a packed Event struct isn’t obvious by reading the
        manpages for Linux, so you have to read the appropriate C header files to know for sure. You
        could of course simply rely on the libc crate (https://github.com/rust-lang/
        libc), which we would do too if we weren’t here to learn things like this for ourselves.
     So, now that we’ve finished walking through the code, there are a few topics that we promised to get
     back to.
     Bitflags and bitmasks
     You’ll encounter this all the time when making syscalls (in fact, the concept of bitmasks is pretty
     common in low-level programming). A bitmask is a way to treat each bit as a switch, or a flag, to
     indicate that an option is either enabled or disabled.
The ffi module 77
An integer, such as i32, can be expressed as 32 bits. EPOLLIN has the hex value of 0x1 (which is simply 1 in decimal). Represented in bits, this would look like 000000000000000000000000 00000001. EPOLLET, on the other hand, has a value of 1 << 31. This simply means the bit representation of the decimal number 1, shifted 31 bits to the left. The decimal number 1 is incidentally the same as EPOLLIN, so by looking at that representation and shifting the bits 31 times to the left, we get a number with the bit representation of 10000000000000000000000000000000. The way we use bitflags is that we use the OR operator, |, and by OR’ing the values together, we get a bitmask with each flag we OR’ed set to 1. In our example, the bitmask would look like 10000000 000000000000000000000001. The receiver of the bitmask (in this case, the operating system) can then do an opposite operation, check which flags are set, and act accordingly. We can create a very simple example in code to show how this works in practice (you can simply run this in the Rust playground or create a new empty project for throwaway experiments such as this): fn main() { let bitflag_a: i32 = 1 << 31; let bitflag_b: i32 = 0x1; let bitmask: i32 = bitflag_a | bitflag_b; println!("{bitflag_a:032b}"); println!("{bitflag_b:032b}"); println!("{bitmask:032b}"); check(bitmask); }
  fn check(bitmask: i32) {
    const EPOLLIN: i32 = 0x1;
    const EPOLLET: i32 = 1 << 31;
    const EPOLLONESHOT: i32 = 0x40000000;
    let read = bitmask & EPOLLIN != 0;
    let et = bitmask & EPOLLET != 0;
    let oneshot = bitmask & EPOLLONESHOT != 0;
    println!("read_event? {read}, edge_triggered: {et}, oneshot?: {oneshot}")
  }
This code will output the following: 10000000000000000000000000000000 00000000000000000000000000000001
78 Create Your Own Event Queue
       10000000000000000000000000000001
       read_event? true, edge_triggered: true, oneshot?: false
     The next topic we will introduce in this chapter is the concept of edge-triggered events, which probably
     need some explanation.
     Level-triggered versus edge-triggered events
     In a perfect world, we wouldn’t need to discuss this, but when working with epoll, it’s almost impossible
     to avoid having to know about the difference. It’s not obvious by reading the documentation, especially
     not if you haven’t had previous experience with these terms before. The interesting part of this is that
     it allows us to create a parallel between how events are handled in epoll and how events are handled
     at the hardware level.
     epoll can notify events in a level-triggered or edge-triggered mode. If your main experience is
     programming in high-level languages, this must sound very obscure (it did to me when I first learned
     about it), but bear with me. In the events bitmask on the Event struct, we set the EPOLLET flag
     to get notified in edge-triggered mode (the default if you specify nothing is level-triggered).
     This way of modeling event notification and event handling has a lot of similarities to how computers
     handle interrupts.
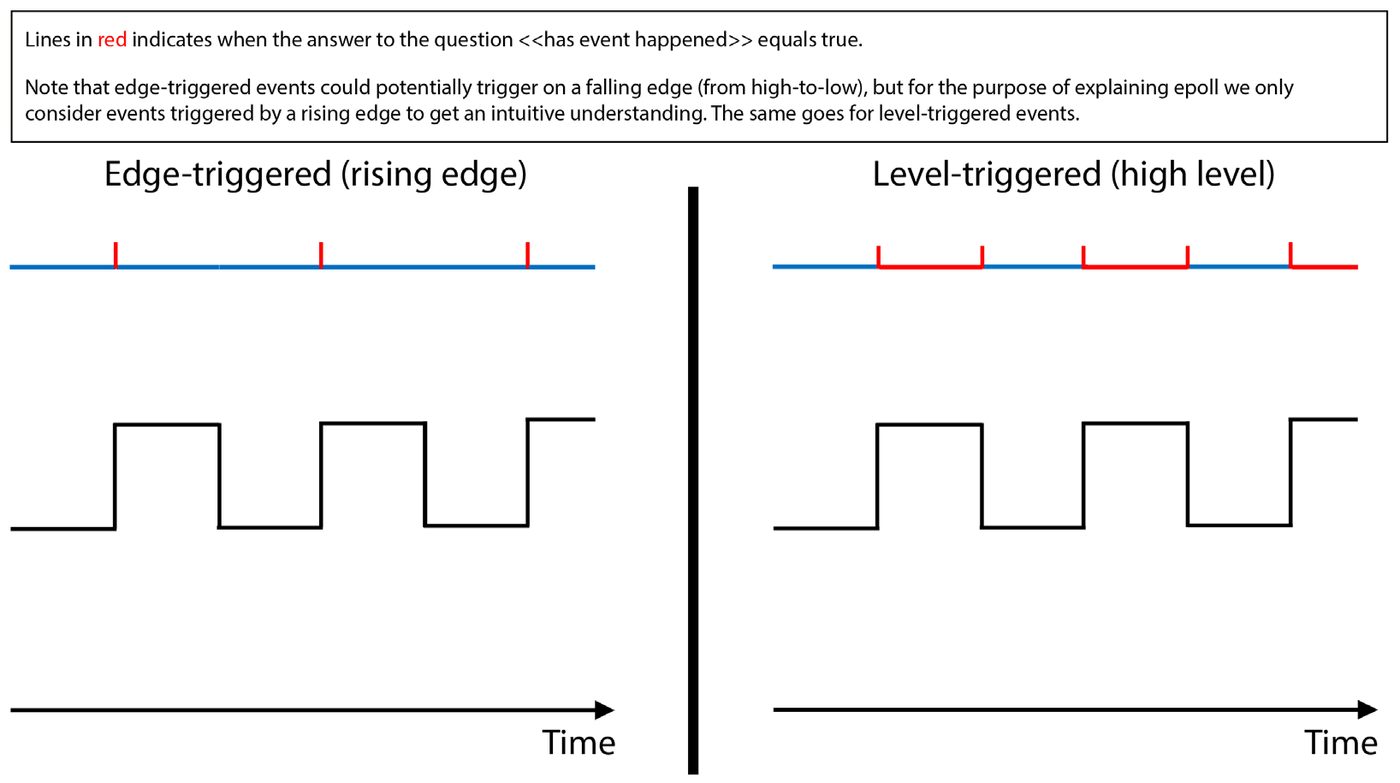
     Level-triggered means that the answer to the question “Has an event happened” is true as long as the
     electrical signal on an interrupt line is reported as high. If we translate this to our example, a read
     event has occurred as long as there is data in the buffer associated with the file handle.
     When handling interrupts, you would clear the interrupt by servicing whatever hardware caused
     it, or you could mask the interrupt, which simply disables interrupts on that line until it’s explicitly
     unmasked later on.
     In our example, we clear the interrupt by draining all the data in the buffer by reading it. When the
     buffer is drained, the answer to our question changes to false.
     When using epoll in its default mode, which is level-triggered, we can encounter a case where we get
     multiple notifications on the same event since we haven’t had time to drain the buffer yet (remember,
     as long as there is data in the buffer, epoll will notify you over and over again). This is especially
     apparent when we have one thread that reports events and then delegates the task of handling the
     event (reading from the stream) to other worker threads since epoll will happily report that an event
     is ready even though we’re in the process of handling it.
     To remedy this, epoll has a flag named EPOLLONESHOT.
The ffi module 79
EPOLLONESHOT tells epoll that once we receive an event on this file descriptor, it should disable the file descriptor in the interest list. It won’t remove it, but we won’t get any more notifications on that file descriptor unless we explicitly reactivate it by calling epoll_ctl with the EPOLL_CTL_MOD argument and a new bitmask. If we didn’t add this flag, the following could happen: if thread 1 is the thread where we call epoll_ wait, then once it receives a notification about a read event, it starts a task in thread 2 to read from that file descriptor, and then calls epoll_wait again to get notifications on new events. In this case, the call to epoll_wait would return again and tell us that data is ready on the same file descriptor since we haven’t had the time to drain the buffer on that file descriptor yet. We know that the task is taken care of by thread 2, but we still get a notification. Without additional synchronization and logic, we could end up giving the task of reading from the same file descriptor to thread 3, which could cause problems that are quite hard to debug. Using EPOLLONESHOT solves this problem since thread 2 will have to reactivate the file descriptor in the event queue once it’s done handling its task, thereby telling our epoll queue that it’s finished with it and that we are interested in getting notifications on that file descriptor again. To go back to our original analogy of hardware interrupts, EPOLLONESHOT could be thought of as masking an interrupt. You haven’t actually cleared the source of the event notification yet, but you don’t want further notifications until you’ve done that and explicitly unmask it. In epoll, the EPOLLONESHOT flag will disable notifications on the file descriptor until you explicitly enable it by calling epoll_ctl with the op argument set to EPOLL_CTL_MOD. Edge-triggered means that the answer to the question “Has an event happened” is true only if the electrical signal has changed from low to high. If we translate this to our example: a read event has occurred when the buffer has changed from having no data to having data. As long as there is data in the buffer, no new events will be reported. You still handle the event by draining all the data from the socket, but you won’t get a new notification until the buffer is fully drained and then filled with new data. Edge-triggered mode also comes with some pitfalls. The biggest one is that if you don’t drain the buffer properly, you will never receive a notification on that file handle again.
80 Create Your Own Event Queue
Figure 4.1 – Edge-triggered versus level-triggered events
     mio doesn’t, at the time of writing, support EPOLLONESHOT and uses epoll in an edge-triggered
     mode, which we will do as well in our example.
        What about waiting on epoll_wait in multiple threads?
        As long as we only have one Poll instance, we avoid the problems and subtleties of having
        multiple threads calling epoll_wait on the same epoll instance. Using level-triggered events
        will wake up all threads that are waiting in the epoll_wait call, causing all of them to try
        to handle the event (this is often referred to as the problem of the thundering heard). epoll
        has another flag you can set, called EPOLLEXCLUSIVE, that solves this issue. Events that are
        set to be edge-triggered will only wake up one of the threads blocking in epoll_wait by
        default and avoid this issue.
        Since we only use one Poll instance from a single thread, this will not be an issue for us.
     I know and understand that this sounds very complex. The general concept of event queues is rather
     simple, but the details can get a bit complex. That said, epoll is one of the most complex APIs in my
     experience since the API has clearly been evolving over time to adapt the original design to suit
     modern requirements, and there is really no easy way to actually use and understand it correctly
     without covering at least the topics we covered here.
     One word of comfort here is that both kqueue and IOCP have APIs that are easier to understand.
     There is also the fact that Unix has a new asynchronous I/O interface called io_uring that will be
     more and more and more common in the future.
The Poll module 81
Now that we’ve covered the hard part of this chapter and gotten a high-level overview of how epoll works, it’s time to implement our mio-inspired API in poll.rs.
The Poll module If you haven’t written or copied the code we presented in the Design and introduction to epoll section, it’s time to do it now. We’ll implement all the functions where we just had todo!() earlier. We start by implementing the methods on our Poll struct. First up is opening the impl Poll block and implementing the new function:
ch04/a-epoll/src/poll.rs
  impl Poll {
      pub fn new() -> Result<Self> {
          let res = unsafe { ffi::epoll_create(1) };
          if res < 0 {
              return Err(io::Error::last_os_error());
          }
          Ok(Self {
              registry: Registry { raw_fd: res },
          })
      }
Given the thorough introduction to epoll in the The ffi module section, this should be pretty straightforward. We call ffi::epoll_create with an argument of 1 (remember, the argument is ignored but must have a non-zero value). If we get any errors, we ask the operating system to report the last error for our process and return that. If the call succeeds, we return a new Poll instance that simply wraps around our registry that holds the epoll file descriptor. Next up is our registry method, which simply hands out a reference to the inner Registry struct:
ch04/a-epoll/src/poll.rs
      pub fn registry(&self) -> &Registry {
          &self.registry
      }
82 Create Your Own Event Queue
     The last method on Poll is the most interesting one. It’s the poll function, which will park the
     current thread and tell the operating system to wake it up when an event has happened on a source we’re
     tracking, or the timeout has elapsed, whichever comes first. We also close the impl Poll block here:
     ch04/a-epoll/src/poll.rs
         pub fn poll(&mut self, events: &mut Events, timeout: Option<i32>) -> Result<()> {
           let fd = self.registry.raw_fd;
           let timeout = timeout.unwrap_or(-1);
           let max_events = events.capacity() as i32;
           let res = unsafe { ffi::epoll_wait(fd, events.as_mut_ptr(), max_events, timeout)
       };
           if res < 0 {
             return Err(io::Error::last_os_error());
           };
           unsafe { events.set_len(res as usize) };
           Ok(())
         }
       }
     The first thing we do is to get the raw file descriptor for the event queue and store it in the fd variable.
     Next is our timeout. If it’s Some, we unwrap that value, and if it’s None, we set it to –1, which is
     the value that tells the operating system that we want to block until an event occurs even though that
     might never happen.
     At the top of the file, we defined Events as a type alias for Vec<ffi::Event>, so the next thing
     we do is to get the capacity of that Vec. It’s important that we don’t rely on Vec::len since that
     reports how many items we have in the Vec. Vec::capacity reports the space we’ve allocated
     and that’s what we’re after.
     Next up is the call to ffi::epoll_wait. This call will return successfully if it has a value of 0 or
     larger, telling us how many events have occurred.
        Note
        We would get a value of 0 if a timeout elapses before an event has happened.
     The last thing we do is to make an unsafe call to events.set_len(res as usize). This
     function is unsafe since we could potentially set the length so that we would access memory that’s not
     been initialized yet in safe Rust. We know from the guarantee the operating system gives us that the
     number of events it returns is pointing to valid data in our Vec, so this is safe in our case.
The Poll module 83
Next up is our Registry struct. We will only implement one method, called register, and lastly, we’ll implement the Drop trait for it, closing the epoll instance:
ch04/a-epoll/src/poll.rs
  impl Registry {
      pub fn register(&self, source: &TcpStream, token: usize, interests: i32) -> Result<()>
  {
          let mut event = ffi::Event {
              events: interests as u32,
              epoll_data: token,
          };
          let op = ffi::EPOLL_CTL_ADD;
          let res = unsafe {
              ffi::epoll_ctl(self.raw_fd, op, source.as_raw_fd(), &mut event)
          };
          if res < 0 {
              return Err(io::Error::last_os_error());
          }
          Ok(())
      }
  }
The register function takes a &TcpStream as a source, a token of type usize, and a bitmask named interests, which is of type i32.
Note This is where mio does things differently. The source argument is specific to each platform. Instead of having the implementation of register on Registry, it’s handled in a platformspecific way in the source argument it receives.
The first thing we do is to create an ffi::Event object. The events field is simply set to the bitmask we received and named interests, and epoll_data is set to the value we passed in the token argument.
84 Create Your Own Event Queue
     The operation we want to perform on the epoll queue is adding interest in events on a new file descriptor.
     Therefore, we set the op argument to the ffi::EPOLL_CTL_ADD constant value.
     Next up is the call to ffi::epoll_ctl. We pass in the file descriptor to the epoll instance first,
     then we pass in the op argument to indicate what kind of operation we want to perform. The last
     two arguments are the file descriptor we want the queue to track and the Event object we created
     to indicate what kind of events we’re interested in getting notifications for.
     The last part of the function body is simply the error handling, which should be familiar by now.
     The last part of poll.rs is the Drop implementation for Registry:
     ch04/a-epoll/src/poll.rs
       impl Drop for Registry {
           fn drop(&mut self) {
               let res = unsafe { ffi::close(self.raw_fd) };
               if res < 0 {
                   let err = io::Error::last_os_error();
                   eprintln!("ERROR: {err:?}");
               }
           }
       }
     The Drop implementation simply calls ffi::close on the epoll file descriptor. Adding a panic
     to drop is rarely a good idea since drop can be called within a panic already, which will cause the
     process to simply abort. mio logs errors if they occur in its Drop implementation but doesn’t handle
     them in any other way. For our simple example, we’ll just print the error so we can see if anything
     goes wrong since we don’t implement any kind of logging here.
     The last part is the code for running our example, and that leads us to main.rs.
     The main program
     Let’s see how it all works in practice. Make sure that delayserver is up and running, because we’ll
     need it for these examples to work.
     The goal is to send a set of requests to delayserver with varying delays and then use epoll to wait
     for the responses. Therefore, we’ll only use epoll to track read events in this example. The program
     doesn’t do much more than that for now.
The main program 85
The first thing we do is to make sure our main.rs file is set up correctly:
ch04/a-epoll/src/main.rs use std::{io::{self, Read, Result, Write}, net::TcpStream};
use ffi::Event; use poll::Poll;
mod ffi; mod poll;
We import a few types from our own crate and from the standard library, which we’ll need going forward, as well as declaring our two modules. We’ll be working directly with TcpStreams in this example, and that means that we’ll have to format the HTTP requests we make to our delayserver ourselves. The server will accept GET requests, so we create a small helper function to format a valid HTTP GET request for us:
ch04/a-epoll/src/main.rs
  fn get_req(path &str) -> Vec<u8> {
      format!(
          "GET {path} HTTP/1.1\r\n\
               Host: localhost\r\n\
               Connection: close\r\n\
               \r\n"
      )
  }
The preceding code simply takes a path as an input argument and formats a valid GET request with it. The path is the part of the URL after the scheme and host. In our case, the path would be everything in bold in the following URL: http://localhost:8080/2000/hello-world. Next up is our main function. It’s divided into two parts:
• Setup and sending requests • Wait and handle incoming events
86 Create Your Own Event Queue
     The first part of the main function looks like this:
       fn main() -> Result<()> {
           let mut poll = Poll::new()?;
           let n_events = 5;
           let mut streams = vec![];
           let addr = "localhost:8080";
           for i in 0..n_events {
               let delay = (n_events - i) * 1000;
               let url_path = format!("/{delay}/request-{i}");
               let request = get_req(&url_path);
               let mut stream = std::net::TcpStream::connect(addr)?;
               stream.set_nonblocking(true)?;
               stream.write_all(request.as_bytes())?;
               poll.registry()
                   .register(&stream, i, ffi::EPOLLIN | ffi::EPOLLET)?;
               streams.push(stream);
           }
     The first thing we do is to create a new Poll instance. We also specify what number of events we
     want to create and handle in our example.
     The next step is creating a variable to hold a collection of Vec<TcpStream> objects.
     We also store the address to our local delayserver in a variable called addr.
     The next part is where we create a set of requests that we issue to our delayserver, which will
     eventually respond to us. For each request, we expect a read event to happen sometime later on in
     the TcpStream we sent the request on.
     The first thing we do in the loop is set the delay time in milliseconds. Setting the delay to (n_events
     - i) * 1000 simply sets the first request we make to have the longest timeout, so we should expect
     the responses to arrive in the reverse order from which they were sent.
The main program 87
Note For simplicity, we use the index the event will have in the streams collection as its ID. This ID will be the same as the i variable in our loop. For example, in the first loop, i will be 0; it will also be the first stream to be pushed to our streams collection, so the index will be 0 as well. We therefore use 0 as the identification for this stream/event throughout since retrieving the TcpStream associated with this event will be as simple as indexing to that location in the streams collection.
The next line, format!("/{delay}/request-{i}"), formats the path for our GET request. We set the timeout as described previously, and we also set a message where we store the identifier for this event, i, so we can track this event on the server side as well. Next up is creating a TcpStream. You’ve probably noticed that the TcpStream in Rust doesn’t accept &str but an argument that implements the ToSocketAddrs trait. This trait is implemented for &str already, so that’s why we can simply write it like we do in this example. Before Tcpstream::connect actually opens a socket, it will try to parse the address we pass in as an IP address. If it fails, it will parse it as a domain address and a port number, and then ask the operating system to do a DNS lookup for that address, which it then can use to actually connect to our server. So, you see, there is potentially quite a bit going on when we do a simple connection. You probably remember that we discussed some of the nuances of the DNS lookup earlier and the fact that such a call could either be very fast since the operating system already has the information stored in memory or block while waiting for a response from the DNS server. This is a potential downside if you use TcpStream from the standard library if you want full control over the entire process.
TcpStream in Rust and Nagle’s algorithm Here is a little fact for you (I originally intended to call it a “fun fact,” but realized that’s stretching the concept of “fun” just a little too far!). In Rust’s TcpStream, and, more importantly, most APIs that aim to mimic the standard library’s TcpStream such as mio or Tokio, the stream is created with the TCP_NODELAY flag set to false. In practice, this means that Nagle’s algorithm is used, which can cause some issues with latency outliers and possibly reduced throughput on some workloads.
Nagle’s algorithm is an algorithm that aims to reduce network congestion by pooling small network packages together. If you look at non-blocking I/O implementations in other languages, many, if not most, disable this algorithm by default. This is not the case in most Rust implementations and is worth being aware of. You can disable it by simply calling TcpStream::set_ nodelay(true). If you try to create your own async library or rely on Tokio/mio, and observe lower throughput than expected or latency problems, it’s worth checking whether this flag is set to true or not.
88 Create Your Own Event Queue
     To continue with the code, the next step is setting TcpStream to non-blocking by calling Tcp
     Stream::set_nonblocking(true).
     After that, we write our request to the server before we register interest in read events by setting the
     EPOLLIN flag bit in the interests bitmask.
     For each iteration, we push the stream to the end of our streams collection.
     The next part of the main function is handling incoming events.
     Let’s take a look at the last part of our main function:
       let mut handled_events = 0;
           while handled_events < n_events {
               let mut events = Vec::with_capacity(10);
               poll.poll(&mut events, None)?;
               if events.is_empty() {
                   println!("TIMEOUT (OR SPURIOUS EVENT NOTIFICATION)");
                   continue;
               }
               handled_events += handle_events(&events, &mut streams)?;
           }
           println!("FINISHED");
           Ok(())
       }
     The first thing we do is create a variable called handled_events to track how many events we
     have handled.
     Next is our event loop. We loop as long as the handled events are less than the number of events we
     expect. Once all events are handled, we exit the loop.
     Inside the loop, we create a Vec<Event> with the capacity to store 10 events. It’s important that
     we create this using Vec::with_capacity since the operating system will assume that we pass
     it memory that we’ve allocated. We could choose any number of events here and it would work just
     fine, but setting too low a number would limit how many events the operating system could notify
     us about on each wakeup.
     Next is our blocking call to Poll::poll. As you know, this will actually tell the operating system
     to park our thread and wake us up when an event has occurred.
     If we’re woken up, but there are no events in the list, it’s either a timeout or a spurious event (which
     could happen, so we need a way to check whether a timeout has actually elapsed if that’s important
     to us). If that’s the case, we simply call Poll::poll once more.
The main program 89
If there are events to be handled, we pass these on to the handle_events function together with a mutable reference to our streams collection. The last part of main is simply to write FINISHED to the console to let us know we exited main at that point. The last bit of code in this chapter is the handle_events function. This function takes two arguments, a slice of Event structs and a mutable slice of TcpStream objects. Let’s take a look at the code before we explain it: fn handle_events(events: &[Event], streams: &mut [TcpStream]) -> Result<usize> { let mut handled_events = 0; for event in events { let index = event.token(); let mut data = vec![0u8; 4096];
          loop {
              match streams[index].read(&mut data) {
                  Ok(n) if n == 0 => {
                      handled_events += 1;
                      break;
                  }
                  Ok(n) => {
                      let txt = String::from_utf8_lossy(&data[..n]);
                      println!("RECEIVED: {:?}", event);
                      println!("{txt}\n------\n");
                  }
                  // Not ready to read in a non-blocking manner. This could
                  // happen even if the event was reported as ready
                  Err(e) if e.kind() == io::ErrorKind::WouldBlock => break,
                  Err(e) => return Err(e),
              }
          }
      }
      Ok(handled_events)
  }
The first thing we do is to create a variable, handled_events, to track how many events we consider handled on each wakeup. The next step is looping through the events we received.
90 Create Your Own Event Queue
     In the loop, we retrieve the token that identifies which TcpStream we received an event for. As we
     explained earlier in this example, this token is the same as the index for that particular stream in the
     streams collection, so we can simply use it to index into our streams collection and retrieve the
     right TcpStream.
     Before we start reading data, we create a buffer with a size of 4,096 bytes (you can, of course, allocate
     a larger or smaller buffer for this if you want to).
     We create a loop since we might need to call read multiple times to be sure that we’ve actually drained
     the buffer. Remember how important it is to fully drain the buffer when using epoll in edge-triggered mode.
     We match on the result of calling TcpStream::read since we want to take different actions based
     on the result:
        • If we get Ok(n) and the value is 0, we’ve drained the buffer; we consider the event as handled
          and break out of the loop.
        • If we get Ok(n) with a value larger than 0, we read the data to a String and print it out
          with some formatting. We do not break out of the loop yet since we have to call read until 0
          is returned (or an error) to be sure that we’ve drained the buffers fully.
        • If we get Err and the error is of the io::ErrorKind::WouldBlock type, we simply
          break out of the loop. We don’t consider the event handled yet since WouldBlock indicates
          that the data transfer is not complete, but there is no data ready right now.
        • If we get any other error, we simply return that error and consider it a failure.
        Note
        There is one more error condition you’d normally want to cover, and that is
        io::ErrorKind::Interrupted. Reading from a stream could be interrupted by
        a signal from the operating system. This should be expected and probably not considered
        a failure. The way to handle this is the same as what we do when we get an error of the
        WouldBlock type.
If the read operation is successful, we return the number of events handled.
        Be careful with using TcpStream::read_to_end
        You should be careful with using TcpStream::read_to_end or any other function that
        fully drains the buffer for you when using non-blocking buffers. If you get an error of the
        io::WouldBlock type, it will report that as an error even though you had several successful
        reads before you got that error. You have no way of knowing how much data you read successfully
        other than observing any changes to the &mut Vec you passed in.
The main program 91
Now, if we run our program, we should get the following output: RECEIVED: Event { events: 1, epoll_data: 4 } HTTP/1.1 200 OK content-length: 9 connection: close content-type: text/plain; charset=utf-8 date: Wed, 04 Oct 2023 15:29:09 GMT
request-4
RECEIVED: Event { events: 1, epoll_data: 3 } HTTP/1.1 200 OK content-length: 9 connection: close content-type: text/plain; charset=utf-8 date: Wed, 04 Oct 2023 15:29:10 GMT
request-3
RECEIVED: Event { events: 1, epoll_data: 2 } HTTP/1.1 200 OK content-length: 9 connection: close content-type: text/plain; charset=utf-8 date: Wed, 04 Oct 2023 15:29:11 GMT
request-2
RECEIVED: Event { events: 1, epoll_data: 1 } HTTP/1.1 200 OK content-length: 9 connection: close content-type: text/plain; charset=utf-8 date: Wed, 04 Oct 2023 15:29:12 GMT
request-1
RECEIVED: Event { events: 1, epoll_data: 0 } HTTP/1.1 200 OK
92 Create Your Own Event Queue
       content-length: 9
       connection: close
       content-type: text/plain; charset=utf-8
       date: Wed, 04 Oct 2023 15:29:13 GMT
request-0
FINISHED
     As you see, the responses are sent in reverse order. You can easily confirm this by looking at the output
     on the terminal on running the delayserver instance. The output should look like this:
       #1 - 5000ms: request-0
       #2 - 4000ms: request-1
       #3 - 3000ms: request-2
       #4 - 2000ms: request-3
       #5 - 1000ms: request-4
     The ordering might be different sometimes as the server receives them almost simultaneously, and
     can choose to handle them in a slightly different order.
     Say we track events on the stream with ID 4:
       1.   In send_requests, we assigned the ID 4 to the last stream we created.
       2.   Socket 4 sends a request to delayserver, setting a delay of 1,000 ms and a message of
            request-4 so we can identify it on the server side.
       3.   We register socket 4 with the event queue, making sure to set the epoll_data field to 4 so
            we can identify on what stream the event occurred.
       4.   delayserver receives that request and delays the response for 1,000 ms before it sends an
            HTTP/1.1 200 OK response back, together with the message we originally sent.
       5.   epoll_wait wakes up, notifying us that an event is ready. In the epoll_data field of the
            Event struct, we get back the same data that we passed in when registering the event. This
            tells us that it was an event on stream 4 that occurred.
       6.   We then read data from stream 4 and print it out.
     In this example, we’ve kept things at a very low level even though we used the standard library to
     handle the intricacies of establishing a connection. Even though you’ve actually made a raw HTTP
     request to your own local server, you’ve set up an epoll instance to track events on a TcpStream
     and you’ve used epoll and syscalls to handle incoming events.
     That’s no small feat – congratulations!
Summary 93
Before we leave this example, I wanted to point out how few changes we need to make to have our example use mio as the event loop instead of the one we created. In the repository under ch04/b-epoll-mio, you’ll see an example where we do the exact same thing using mio instead. It only requires importing a few types from mio instead of our own modules and making only five minor changes to our code! Not only have you replicated what mio does, but you pretty much know how to use mio to create an event loop as well!
Summary The concept of epoll, kqueue, and IOCP is pretty simple at a high level, but the devil is in the details. It’s just not that easy to understand and get it working correctly. Even programmers who work on these things will often specialize in one platform (epoll/kqueue or Windows). It’s rare that one person will know all the intricacies of all platforms, and you could probably write a whole book about this subject alone. If we summarize what you’ve learned and got firsthand experience with in this chapter, the list is quite impressive:
• You learned a lot about how mio is designed, enabling you to go to that repository and know what to look for and how to get started on that code base much easier than before reading this chapter • You learned a lot about making syscalls on Linux • You created an epoll instance, registered events with it, and handled those events • You learned quite a bit about how epoll is designed and its API • You learned about edge-triggering and level-triggering, which are extremely low-level, but useful, concepts to have an understanding of outside the context of epoll as well • You made a raw HTTP request • You saw how non-blocking sockets behave and how error codes reported by the operating system can be a way of communicating certain conditions that you’re expected to handle • You learned that not all I/O is equally “blocking” by looking at DNS resolution and file I/O
That’s pretty good for a single chapter, I think! If you dive deeper into the topics we covered here, you’ll soon realize that there are gotchas and rabbit holes everywhere – especially if you expand this example to abstract over epoll, kqueue, and IOCP. You’ll probably end up reading Linus Torvald’s emails on how edge-triggered mode was supposed to work on pipes before you know it.
94 Create Your Own Event Queue
     At least you now have a good foundation for further exploration. You can expand on our simple
     example and create a proper event loop that handles connecting, writing, timeouts, and scheduling;
     you can dive deeper into kqueue and IOCP by looking at how mio solves that problem; or you can
     be happy that you don’t have to directly deal with it again and appreciate the effort that went into
     libraries such as mio, polling, and libuv.
     By this point, we’ve gained a lot of knowledge about the basic building blocks of asynchronous
     programming, so it’s time to start exploring how different programming languages create abstractions
     over asynchronous operations and use these building blocks to give us as programmers efficient,
     expressive, and productive ways to write our asynchronous programs.
     First off is one of my favorite examples, where we’ll look into how fibers (or green threads) work by
     implementing them ourselves.
     You’ve earned a break now. Yeah, go on, the next chapter can wait. Get a cup of tea or coffee and reset
     so you can start the next chapter with a fresh mind. I promise it will be both fun and interesting.